Tag: Lunch
Havarti: The Danish Cheese, not the Cheese Danish
When we think about Danish cheeses, we often think about Danish Blue, Esrom, Danbo… but, by far the most popular cheese that is exported from Denmark is Havarti.
Havarti is a semi-soft cheese, which has a creamy buttery flavor. It goes great on the cheese board with figs and sliced bread, or melted atop a sandwich. But, what else do we know about this cheese?
The Origins of Havarti

As noted above, Havarti is a Danish cheese; but the inspiration of this delicious treat comes from one woman’s travels around Europe during the mid 1800s. The commonly accepted story is that Hanne Nielsen was the wife of a New Zealand farmer that was extremely interested in learning about cheesemaking; and, in addition to traveling around Europe, learning different techniques, she set up a farm where she perfected her craft. The town where she set up her experimental farm, called Havarthigaard, is located north of Copenhagen; and, during the mid 1900s, became the source of Havarti’s name. (Source: Havarti Cheese Production and Uses)
What is Creamy Havarti?
Creamy Havarti (flødehavarti) is different from what would be considered the “original” Havarti, in that it is made with highly pasteurized milk, such that the whey proteins are not separated from the cheese curds; so, the end product is a lot richer and creamier.
The “original” Havarti is very similar to Swiss cheese in flavor and texture–but also, in that it is typically aged around 3 months. Creamy Havarti cannot be ripened for very long because the whey protein doesn’t age very well.

The Havarti Experience
If you go to the supermarket, you will often find that there are many different kinds of Havarti. Much like chevre, this cheese is sold in varieties with fruits and/or herbs and spices, as well as original flavor. Some of the varieties you may find include cranberry, garlic, caraway, basil, coconut, and sour cream & chives; but, by far the most popular ones are dill, red pepper, and jalapeño.
Havarti is truly versatile. It is an excellent table cheese and is great on sandwiches and salads. It is a great melting cheese so, fondue and paninis should not be overlooked.
Looking for a great wine to pair with Havarti? It goes really well with just about any wine, but goes particularly well with sweet wines like Beaujolais and Riesling. If you’re going pick a red wine, try to keep with lighter-bodied wines.
Wrapping up
Havarti is certainly one of my favorite cheeses–and, I think it was one of the very first cheeses I tried when I started John Eats Cheese. If you’re looking to learn more about cheese or are looking for unintimidating cheese to start with on your journey of fromage exploration pick up some crackers and Creamy Havarti, and go to town.
Let us at Shisler’s Cheese House help you get your taste on with our supply of Havarti!
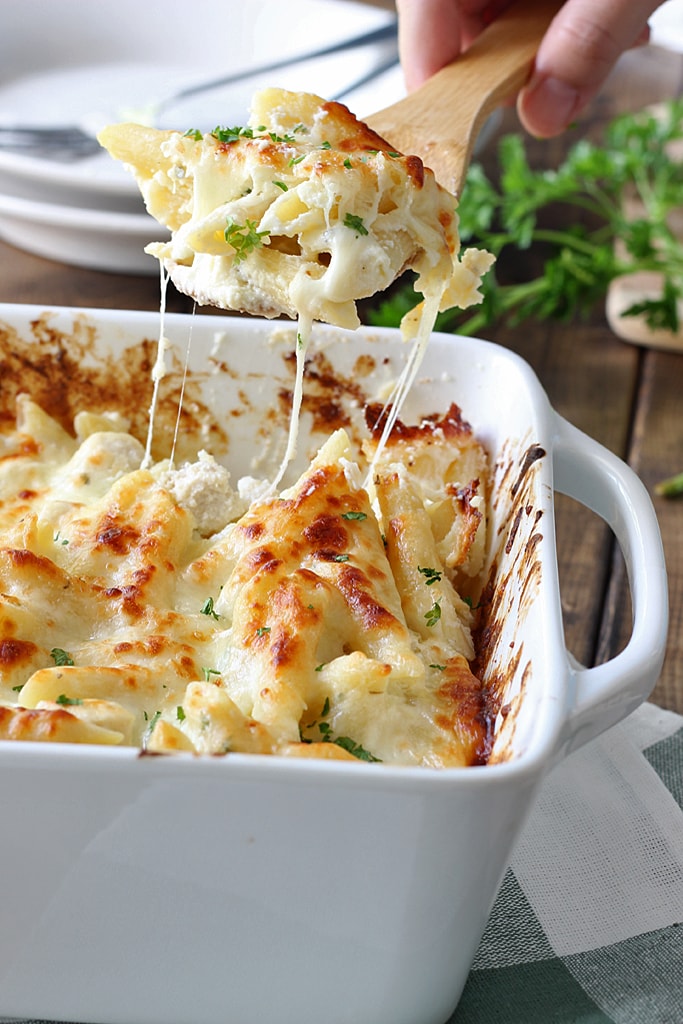
Chicken Alfredo Pasta Bake: For the Cheese and Pasta Lover
CHICKEN ALFREDO PASTA BAKE
I don’t know about you, but I love a good Alfredo. It’s rich, it’s oh so yummy. And why shouldn’t we love it? It has all the goodness of butter, cream and Parmesan. Creamy. Cheesy. Yummy. So today we’re taking good old Alfredo sauce and making a chicken pasta bake. And we’ll add more cheese plus other stuff to make a great summer pasta casserole.
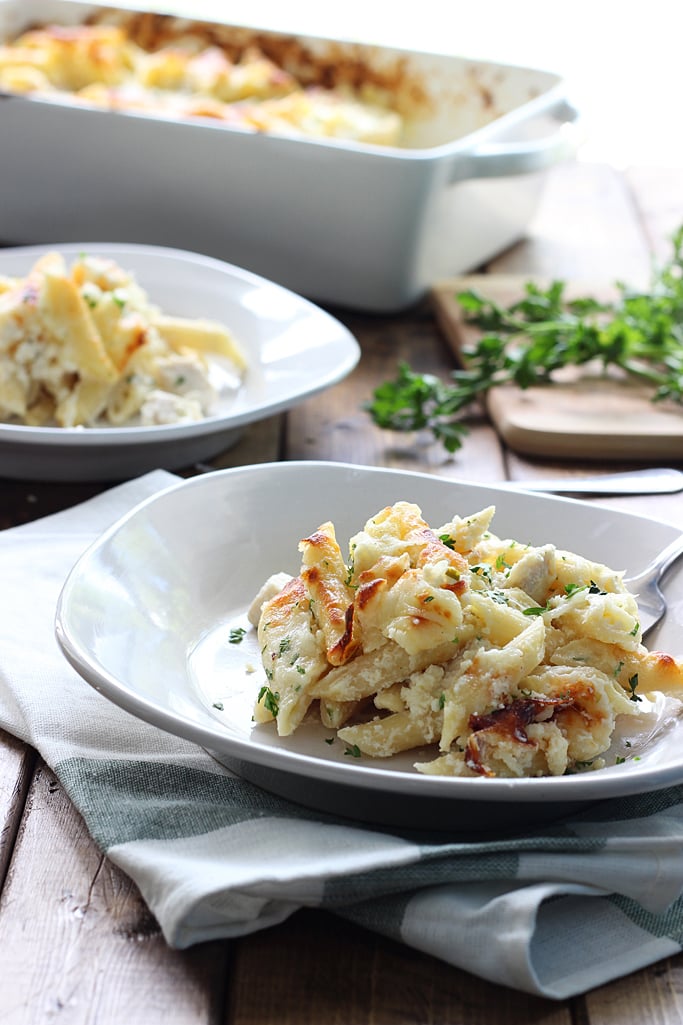
So if you’re wanting cheese, this is your dish! This makes a huge serving to go around and it heats up well. It’ll make that wet squishy sound when you mix it all up, a sign of tons of creamy cheesy power. It’ll give you long strands of cheese when you dish a serving. The kind that you’ll want to run your finger along to break. And it’ll more than satisfy your cheese craving.
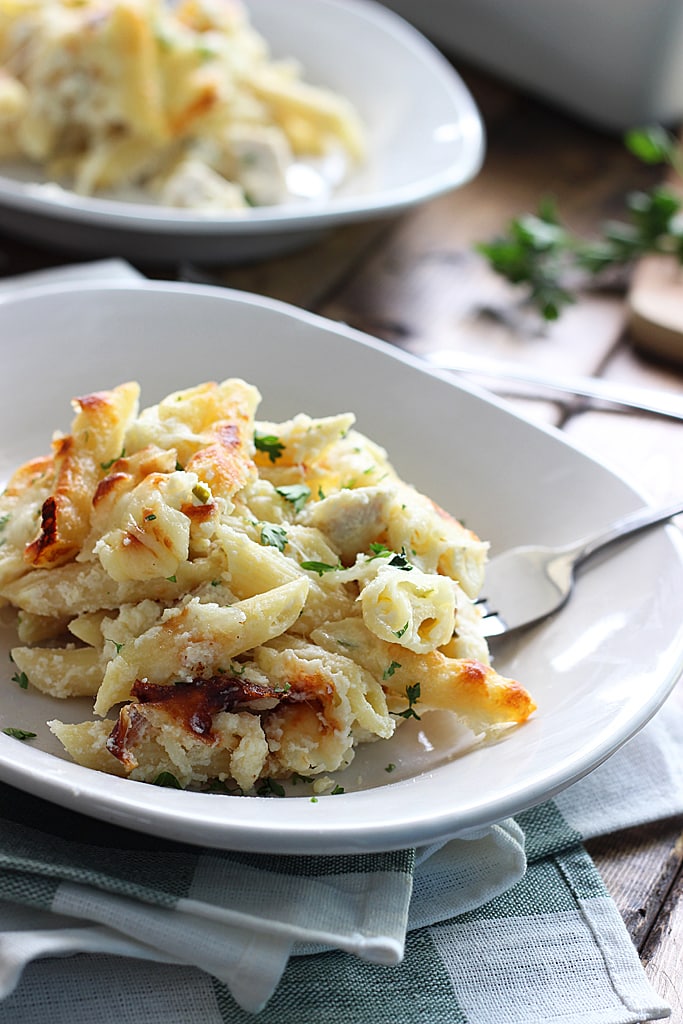
The great thing about this is how you can customize it to save you time. The best Alfredo sauce from scratch but you can use store-bought sauce. If you don’t like poached chicken, grill it. Or buy some rotisserie chicken and chop it up. And you can practically use any kind of pasta you want. Generally, penne is deal for bakes but there’s ziti and rigatoni.
Make sure to cook the pasta until the point just before it turns al dente. Then rinse it under cold water to stop the cooking process. Because if it continues cooking in the cheese sauce in the oven, it’ll get slightly mushy and mushy pasta is no fun…. to avoid this, finish off the al dente process in the oven. However, if you don’t mind or even like mushy pasta, then keep on cooking that pasta until it’s al dente, your choice…
There’s a lot of ricotta to go around, as you can see. So if you’re not big on it, you can halve the ricotta and egg portion before mixing it in with everything. Some people like it, some people don’t, again, your choice…
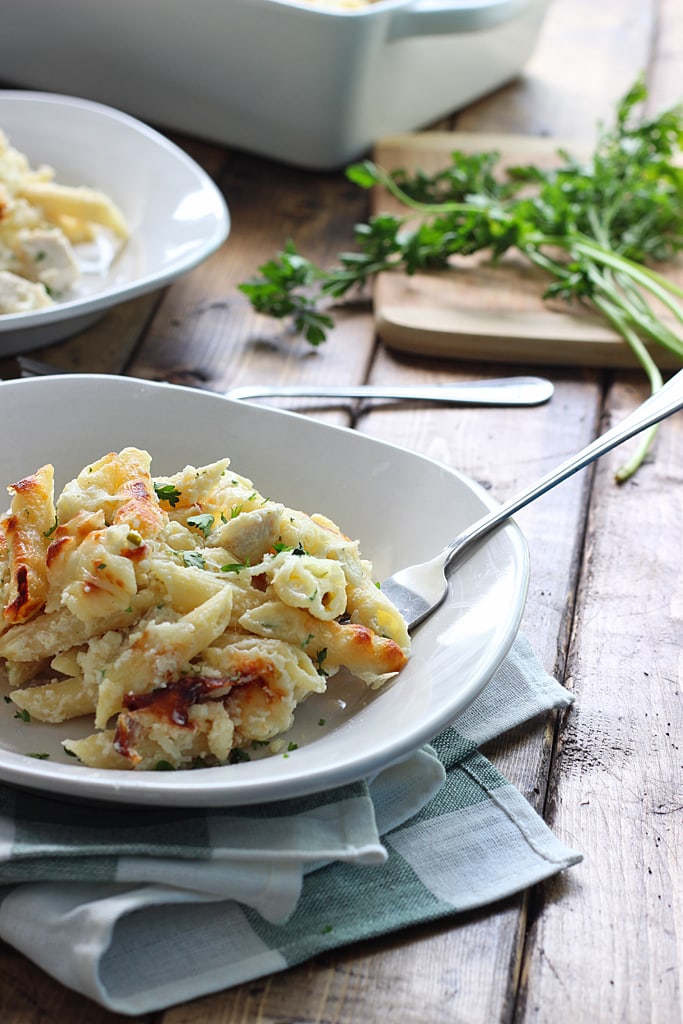
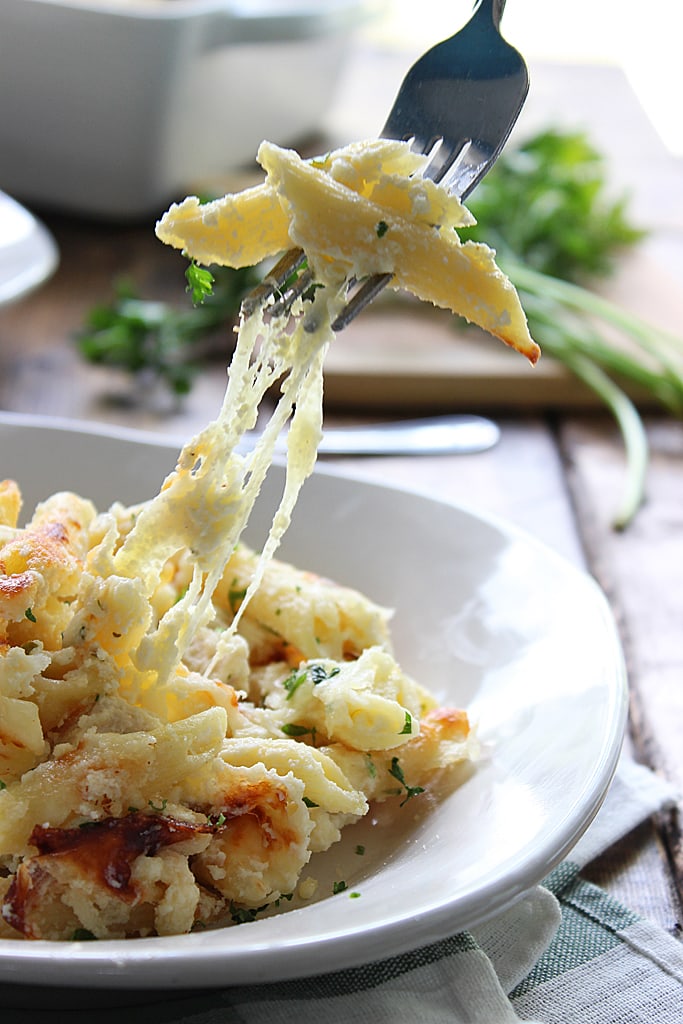
So really, if you’re looking for a fairly quick, but delicious meal idea for lunch or dinner, this one’s for you, as the amount of time it takes from start to eat is just under and hour…. not bad at all… Or if you’re a family of four and you want something for two days, here you go. And if you have a huge family, have at it. This can serve up to ten servings. The cheese is not stingy!
- 16 oz. penne/ziti/rigatoni pasta
- 2 cups Alfredo sauce
- 8 oz. sour cream
- 3 cups poached/grilled/rotisserie chicken, cubed
- 15 oz. ricotta cheese
- 1 teaspoon garlic, minced
- 2 eggs, beaten
- ¼ cup Parmesan cheese, shredded
- 1 tablespoon parsley, chopped
- Salt and pepper to taste
- 2 cups mozzarella cheese, shredded
- Cook the pasta till just before al dente
- Drain and rinse pasta under cold water to stop the cooking process
- If you’re making Alfredo sauce from scratch, see notes
- Mix pasta with the Alfredo sauce, sour cream and chicken
- Combine ricotta, garlic, eggs, Parmesan and parsley and mix throughly
- Season the pasta mix with salt and pepper to taste
- Add the ricotta mixture to the pasta and stir to combine
- Top with a thick layer of mozzarella cheese
- Bake in a 9×13 casserole dish at 350 degrees F for 30 minutes or until bubbly
- Broil at 450 degrees F for 2-3 minutes or until the cheese starts to brown
- Serve hot
What’s Better Than A Cavs’ Championship? Smoked Gouda Mashed Potatoes
Gouda, or “How-da” as the locals say, is a Dutch cheese named after the city of Gouda in the Netherlands. If truth be told, it is one of the most popular cheeses in the world, accounting for 50 to 60 percent of the world’s cheese consumption. It is a semi-hard cheese celebrated for its rich, unique flavour and smooth texture. The original cheese markets in Gouda is one of the last standing commercial cheese markets in the Netherlands. Since the name is not protected, it has become a generic classification for all cheeses produced and sold under the name Gouda.
Gouda is typically made from pasteurised cow’s milk although some artisan varieties use sheep’s or goat’s milk to produce cheeses that are going to be aged for a long time. Boerenkaas is a typical variety of unpasteurised Gouda cheese produced by the farmers from milk of cow’s grazing on the natural, low pastures of Netherlands. There are seven different types of Gouda cheese, categorized depending on age. Graskaas is young Gouda ready to be consumed within weeks of production. On the other hand, is the extra aged, Overjarig cheese which has a full-flavoured, hard, golden interior and salty flavour reminiscent of a toffee. Between the spectrums is a variety of Dutch Gouda’s classified as per the texture and age – Jong, Jong belegen, Belegen, Extra belegen, and Oud. Each cheese gets increasingly firmer in texture and richer in flavour than earlier classification. The waxed rind of the cheese also changes by the age as soft, younger Dutch Gouda cheese are identified by yellow, orange, or red wax rinds white mature cheese have black wax coverings.

In America, smoother and less flavorful commercial Gouda is popular than Dutch Gouda. Artisans in Netherlands may produce Dutch Gouda using raw milk as well as pasteurized. To enhance the flavor of the cheese, herbs, seasonings, and nuts may be blended. In Netherlands, aged Gouda is commonly used to richen soups, sauces.
Young Goudas are best paired with beer while medium cheeses taste best when paired with a fruity Riesling or Chenin Blanc. A well aged Gouda complements wines that are deeply flavored such as a rich Merlot or Shiraz. Gouda cheese may be grated, sliced, cubed or melted. It may be used as a table cheese or dessert cheese.
SMOKED GOUDA MASHED POTATOES
![]()
Fancying up mashed potatoes can take a plain Jane dish and make it a stand out yummy. Sorry if your name is Jane. What better to make something stand out than smoked gouda? Oh baby. It’s yummy. Add 1 cup for a hint of smokey goodness, and 2 cups for a heavier handed approach. Or maybe your tastes will fall somewhere in between. This is a fabulous twist on your standard taters. Live a little, right?
Time to Make It: about 30 minutes
Yield: Serves 6 to 8
Ingredients
6 large russet potatoes
6 cups chicken broth
1/2 cup butter
4 oz cream cheese
1 tsp salt
1/2 tsp white pepper
1 to 2 cups shredded smoked Gouda Cheese
Instructions
1. Bring the chicken broth to a boil in a large stockpot. (If you need more liquid to cover your potatoes, you can add in water.)
2. Meanwhile, peel and rinse the potatoes. Cut them into bite-size pieces. Pace them in the chicken broth. Return to a boil, reduce heat to medium low, and simmer until potatoes are soft, about 10 to 15 minutes depending on the size of pieces.
3. Drain the liquid from the potatoes. Add in butter, cream cheese, salt, and pepper. Use a hand mixer to whip until smooth, or mash together with a potato masher until cheese and butter are melted.
4. Mix in the Smoked Gouda until cheese is melted. Serve hot.
Be sure you stop by Shisler’s Cheese House and to grab your supply of Smoked Gouda!
Insalata Caprese: Simple, Elegant, Refreshing, Delicious
INSALATA CAPRESE: THE ENDURING STYLE OF ITALIAN CUISINE

No one can quite say when or where the most famously simple of all salads — the insalata caprese — first appeared on the scene, or the exact origin of when it was named after that beautiful sun-soaked isle of Capri, part of very historic Campania region. But one thing we do know is that it is absolutely one of the most enduring of all Italian antipasti and so evocative of those heady days of fun, vino and romance along the Mediterranean coast. (Speaking of fabulous Italian things, be sure to check out the recent post Studio of Style did on Campari.) Of course, the famed tricolor look of the dish which, like the equally famed Margherita pizza of Napoli, depict the colors of the Italian flag. But let’s dig a little bit deeper into history, okay? (We know how you regular readers of Studio of Style just love a little bit more of everything, right?) First of all, so much of the world associates Italian cuisine with that wonderful deep red tomato sauce found on many dishes — but wait! The word “pomodoro” from the words “pomo d’oro” or “golden apple” doesn’t quite match up with the color red, now does it? That’s because the first tomatoes brought to Europe from the New World (i.e. The Americas) were actually more likely to have been yellow than red! More on that in a moment. But some say that “pomo d’oro” might also be a mistranslation of the phrase “pomo di moro” or “fruit of the Moors” who had introduced so many exotic foods to Italy. You see, it was Italian physician and botanist Pietro Andrea Mattioli who wrote in 1544 that a new type of eggplant had been brought to Italy which was blood red or golden in color that could be eaten like an eggplant — and 10 years later Mattioli used the words “pomo d’oro” in print. The yellow variety of the tomato definitely made landfall in Europe sometime after 1521 when Spanish conquistador Hernán Cortés captured the Aztec capital of Tenochtítlan in Mexico — though Christopher Columbus of Genoa (who was also working on behalf of the Spanish monarchy) might very well have brought some back around 1493! And did you know that the earliest known Italian cookbook with tomato recipes was published in Naples (naturally!) around 1692 — most likely the recipes were translated from Spanish sources. Thus, by a slight twist of history the famed marinara sauces became red and not yellow (but the name “golden apple” still stuck!). But the bigger question is: who put together that amazing combination of basil, mozzarella di bufala, tomatoes and olive oil — crowned with a light sprinkling of salt and black pepper — a combo that epicureans have been raving about ever since? To enjoy this antipasto to the fullest, try to find the freshest handmade mozzarella, the ripest seasonal tomatoes, absolutely fresh basil, the best extra virgin olive oil and high quality salt and freshly ground black pepper (and please, novinegar of any kind!!). Said perhaps one of the most famous Italians of all history, Leonardo da Vinci: “Simplicity is the ultimate sophistication.” And how right he was…and still is! The simple yet profound pleasures found in insalata caprese transcend time itself! And in the words of so many Italians throughout the ages: Mangia bene, vivi felice!
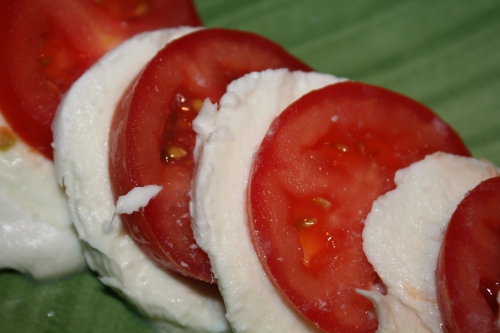
Once again, you can see the colors of the italian flag in this dish. Insalata Caprese is one of my all time favorite salads. I like to serve it over a bed of fresh spinach. Refreshing and light!
The word mozzarella comes from the italian verb “mozzare” which means to cut. Mozzarella di bufala is made from the milk of the domestic water buffalo, a bovine which has it origins in Asia but is now found in southern Europe, South America, Northern Africa and India among others. Mozzarella di bufala is a bit saltier and softer than regular cow’s milk mozzarella. The best quality is considered by many Mozzarella di Bufala di Campania made in the geographical areas of Lazio (near Rome) and Campania (Naples, Salerno, Paestum, Pompeii, including Capri) Regions which became protected by the European Union under Denominazione di Origine Controllata (DOC like in wines) in the 1990’s. It literally melts in your mouth! In short, mozzarella is made by heating the milk (to separate the whey form the curds), resting, spinning and pulling the cheese curds to shape into balls. The cheese maker will knead the curds like bread by hand, pull-out and cut the mozzarella balls once the cheese curds have reached the desired consistency. This is a semisoft cheese and has a high moisture content. That is why it is sold in specialty food shops in brine and vacuum sealed. On the other hand, good quality mozzarella di bufala is made in many other countries in Europe and the Americas.
Insalata Caprese (salad made in the style of Capri) can also be called Tricolore Salad which also includes avocado. If you want to splurge (it is more expensive than regular mozzarella) and the best flavor and quality, use mozzarella di bufala when you make homemade pizza. Use it as a topping or make Insalata Caprese Pizza. It is amazing!
Buon Appetito!
Instructions on making Insalata Caprese…
Ingredients
2 7 ounce mozzarella di bufala balls
2-3 Roma tomatoes
2 tbsp fresh basil coarsely chopped
1/2 tsp kosher salt
1/4 cup extra virgin olive oil
Pepper to taste
Drizzle of good quality aged balsamic vinegar (optional)
Procedure
1. Slice mozzarella and tomatoes. In a plate, alternate placing one slice of tomato over each slice of mozzarella.

2. In a small bowl, place the chopped basil with olive oil, salt and pepper and stir with a spoon.
3. Spoon mixture over mozzarella and tomatoes. Drizzle with balsamic vinegar and serve.
4. Enjoy this delicious and healthy dish!
Make sure to stop by Shisler’s Cheese House and let us help you create this simply, beautiful and delicious work of culinary art with our supply of fresh Mozzarella Cheese!
Cheese Makes Everything Better: Great Lunch Recipes For The Cheese Lovers
Struggling to find ideas for lunch? Tired of the same ol’ leftovers? We hear you and we want to help you solve this dilemma. Afterall, while breakfast is the most important meal of the day, lunch too often gets overlooked. Lunch is a critical meal in the middle of your day as it refuels you at the midway point in your day and recharges you to the finish line.
Without further adieu, here are some great ideas for you to make your next lunch creation. The best part about these recipes is that they have the cheese lover in mind!
MAC N’ CHEESE WITH BACON AND CHEESE

INGREDIENTS
- Kosher salt
- 1 pound elbow macaroni
- 4 cups milk
- 2 or 3 sprigs thyme
- 4 cloves garlic, smashed and divided
- 3 tablespoons unsalted butter
- 3 tablespoons all-purpose flour
- 5 1/2 cups shredded sharp white Cheddar
- Freshly ground black pepper
- 1/4 cup chopped flat-leaf parsley
- 4 slices bacon, cut crosswise into thin strips
- 1 large onion, diced
- 2 garlic cloves, smashed
- Leaves from 1/4 bunch fresh thyme
DIRECTIONS
Preheat the oven to 400 degrees F.
In a small saucepan heat the milk with the thyme sprigs and 2 garlic cloves. Melt the butter in a large, deep skillet over medium-high heat. Whisk in the flour and cook for about 1 minute, stirring constantly, to keep lumps from forming. Strain the solids out of the milk and whisk it into the butter and flour mixture. Continue to whisk vigorously, and cook until the mixture is nice and smooth. Stir in the 4 cups of the cheese and continue to cook and stir to melt the cheese. Season with salt and pepper. Add the cooked macaroni and the parsley and fold that all in to coat the macaroni with the cheese mixture. Scrape into a 3-quart baking dish and sprinkle with the remaining 1 1/2 cups cheese. Bake for 30 minutes, or until hot and bubbly.
While that bakes, heat a saute pan. Add the bacon, render the fat and cook until crispy. Add onion, garlic and thyme leaves and cook for about 5 minutes to soften the onion. Season with salt and pepper.
To serve, scatter the bacon mixture over the mac and cheese. Use a big spoon to scoop out servings, making sure you get some of the smoking bacon mixture on each spoonful.
GRILLED CHEESE WITH CARAMELIZED ONIONS

INGREDIENTS
- 2 tablespoons/30ml olive oil
- 3 large onions, sliced
- Salt and pepper
- 8 thick slices bread
- 1/4 cup/60ml butter, room temperature
- 2 cups/500ml grated aged Cheddar
DIRECTIONS
Generously butter both sides of each bread slice. In between two bread slices, pile the caramelized onions between two layers of cheese.
Heat a large skillet or griddle over medium-low heat. Cook the sandwiches, flipping once, until the cheese is melted and the bread is golden brown, 2 to 3 minutes per side.
SCALLOPED POTATOES AU GRATIN

INGREDIENTS
- 1 tablespoon unsalted butter
- 1 yellow onion, finely chopped
- 2 cloves garlic, minced
- 1 1/2 cups heavy cream
- 1/2 cup low-sodium chicken broth
- 2 teaspoons fresh thyme leaves
- 1 1/2 teaspoon kosher salt
- 1/2 teaspoon ground black pepper
- 2 pounds russet potatoes, peeled and sliced into 1/8-inch slices
- 1/2 cup shredded Cheddar
- 1/2 cup shredded gruyere cheese
DIRECTIONS
Melt the butter in a large pot over medium-high heat. Add the onions and saute until softened and beginning to brown. Add the garlic and continue cooking 1 minute longer. Stir in the cream, broth and thyme, and season with the salt and pepper. Add the potatoes and bring to a simmer. Continue cooking until the potatoes are fork-tender, 10 to 15 minutes.
Transfer the potatoes and cream to a shallow baking dish. Sprinkle the cheeses evenly over the potatoes. Bake until bubbly and the surface begins to brown, 15 to 20 minutes. Let sit 10 minutes before serving.
PARMESAN-CRUSTED GRILLED CHEESE

INGREDIENTS
CREAMY STOVETOP BACON MAC AND CHEESE:
- Kosher salt
- 1 pound elbow macaroni
- 6 strips thick-cut smoked bacon, cut in 1/4-inch pieces
- 1/4 cup all-purpose flour
- 4 cups hot whole milk
- Freshly cracked black pepper
- 1 teaspoon dry mustard, or more as needed
- 8 ounces sharp Cheddar, shredded (2 cups)
- 8 ounces Muenster cheese, shredded (2 cups)
- 1 tablespoon hot sauce
PARMESAN-CRUSTED GRILLED CHEESE:
- Eight 1/2-inch thick slices brioche
- 8 slices American cheese
- 3 tablespoons chopped fresh basil
- 4 tablespoons crushed Calabrian hot chile peppers, from jar
- 8 slices tomato, cut thin (or 4 large slices, depending on how big your tomato is)
- 2 1/2 cups grated Parmesan
DIRECTIONS
For the grilled cheese: Top all 8 slices of bread with a slice of American cheese. This will act as your glue. Spoon 1/2 cup of the mac and cheese onto four of the slices, sprinkle with some basil, and then add a dollop of the spicy peppers. Top with 1 or 2 tomato slices, and cover with a second slice of bread.
In a large nonstick skillet set over medium heat, spread 1/3 cup of the grated Parmesan in an even circle roughly the same size as your bread. Let the Parmesan begin to melt and brown, 2 to 3 minutes. As soon as it gets golden brown, set a sandwich on top of the Parmesan. Cook for 2 minutes more. The Parmesan will adhere to the bread and create a nice crispy crust. Remove the sandwich from the skillet and repeat the same process for the other side of the sandwich. Depending on the size of your pan, you may be able to do two sandwiches at a time. If needed, keep finished sandwiches warm in a 200 degree F oven while the others are cooking.
Be sure to stop by Shisler’s Cheese House and let us help you make create your next lunch masterpiece with our selection of imported and domestic cheeses and meats.
RECIPE: Cheddar and Bacon Stuffed Chicken Breasts
Cheddar and Bacon Stuffed Chicken Breasts
So it’s about the end of the day at work and you’re struggling to come up with ideas of what to make for dinner. Not only that, but you also want to try to deviate away from the norm and let your taste buds reach a new level of extreme tastiness. Here is a recipe that will truly satisfy those taste buds without breaking the wallet and with simple, easy to find ingredients at the grocery store.
Cheddar-And-Bacon-Stuffed Chicken Breasts
Ingredients
1) 6 slices bacon
2) 2 boneless, skinless chicken breasts
3) Salt and pepper
4) 2 teaspoons Dijon mustard, if desired
5) 1/4 cup grated cheddar cheese
Preparation
Preheat oven to 300 degrees.
Cook bacon on stove in oven-safe skillet until cooked but not crisp. Transfer to a paper towel-lined plate.
Flatten chicken breasts to about 1/4- to 1/8-inch thickness, and lightly season with salt and pepper.
Spread a teaspoon of Dijon mustard on each chicken breast, if desired.
Lay three pieces of bacon on each chicken breast, and top the bacon with the cheddar cheese.
Roll up each chicken breast, being careful to keep the bacon and cheddar tucked inside, and secure each with toothpicks.
Place the chicken rollups back in the pan with bacon grease and cook on the stove over medium heat, turning frequently, just to brown all sides.
Transfer the pan to the oven, and bake for 25 to 30 minutes, until chicken is cooked through. Feel free to baste the chicken with some of the bacon grease while it’s baking. (I warned you this was not diet food.)
Serve hot, preferably with some of these pretzel rolls.
The Art of Cooking Amazing Bacon, A Masterpiece!
Bacon Cooking Tips
If the packaged sliced bacon is refrigerator-cold, slowly slide the dull edge of a butter knife along the length between the strips, gently rocking to separate slices. Plan ahead and take the bacon out of the refrigerator thirty minutes before cooking. The slices should separate easily.
When frying bacon, it’s important to keep a close eye on it and turn it often. It can burn in the blink of an eye. Older bacon will cook and burn almost twice as quickly as fresh bacon.
If you prefer very crispy bacon, choose thinner slices to fry up. Pour or baste off the fat as it accumulates in the pan. Use medium to medium-low heat. Cook slowly, turning often, to render out the most fat and help reduce shrinkage.
Pricking with a fork will help alleviate any curling problems. Drain breakfast bacon on paper towels.
The fat rendered from the cooked bacon is highly-prized as cooking oil for its flavor. After cooking the bacon, cool the rendered oil to room temperature and then pour through a fine sieve into a glass container. Cover and store in the refrigerator or freezer for future use. If you do not need the rendered fat, let it cool to room temperature, pour it into a disposable metal or glass container, seal, tie it up in a plastic bag, and toss it into the trash. It’s not wise to pour it down the drain, because it will coagulate and clog up the drain.
There are fancy microwave bacon cookers on the market which work well, but they are not necessary. Place a microwave-safe paper towel in a micro dish large enough to fit a single layer of bacon slices (4 to 6 slices). Cover with another paper towel. Six slices should take about 4 to 5 minutes on high, depending on the wattage of your microwave and the thickness of the bacon. Start checking after the first two minutes, and continue cooking at one minute intervals until you can judge the cooking time for the way you like it.
Consult your microwave manual for more specific times. A rotating base in the microwave is highly recommended for even cooking, and most come with one built-in these days. Remember that foods continue to cook even after the timer goes off in a microwave, so let it rest a few minutes before you dive in to let it crisp up and avoid burns. Curly bacon never bothers me, but this method reduces curling of the bacon.
Bacon can also be easily baked in the oven, resulting in amazingly flat slices. Preheat oven to 400 degrees F. Place a rack inside a baking sheet. Lay out slices and bake for 10 to 15 minutes, depending on desired doneness level. Voila! Crispy bacon with no curls. You can also use your broiler, but I don’t recommend it. First of all, the splatters not only make a royal mess, but also cause flares. Secondly, it requires much more attention. Stick with frying, microwaving or baking.
How can you reduce splattering problems? Part of the problem arises from today’s quick salt-brining method (known as pickle-curing) used by producers. The liquid naturally soaks into the meat, and you know what happens when liquid hits hot oil — snap, crackle, pop! Be sure the bacon slices are cold from the refrigerator and start with a cold pan. Use medium to medium-low heat and take your time cooking the slices, turning often. It’s preferable to thaw frozen bacon in the refrigerator to reduce moisture, but even then some of the moisture may naturally seep out. Towel off the slices before cooking to avoid excess splattering.
If you must watch your fat intake, lean smoked ham or prosciutto can be substituted in many recipes where the rendered bacon fat is not needed. Turkey, chicken and vegetarian bacon products are also available.
Most slab bacon is sold with the rind attached. Remove the rind before using. Render the fat from the rind by frying and you have cracklings, a favorite Southern snack.
At Shisler’s Cheese House, we carry an amazing inventory of Streb’s Meats Smoked Bacon. Be stop by our store and pick some up today!
Amazing Recipes To Satisfy Your Hunger For Cheese
Something warm for lunch: straight-from-the-oven ham and cheese turnovers.

INGREDIENTS
- 1 1-pound package refrigerated pizza dough
- 8 ounces deli ham, thinly sliced
- 4 ounces Swiss cheese, thinly sliced
- 1/2yellow onion, cut into thin rings
- 2 teaspoons whole-grain mustard
- 2 tablespoons extra-virgin olive oil
- 1 small head romaine, torn into pieces
- Heat oven to 400° F. Roll the pizza dough into a 14-inch circle and cut into 8 triangles.
- Stack a slice of ham and cheese and some onion on the bottom of each triangle and roll the dough up around the filling. (Some will stick out the ends.)
- Transfer the rolls to a parchment-lined baking sheet. Bake until golden and crisp, about 20 minutes.
- Combine the mustard and oil in a medium bowl and toss with the romaine. Serve with the turnovers.
Cheddar cheese and horseradish give an ordinary roast beef wrap some bite.

INGREDIENTS
- 4 ounces cream cheese, softened
- 2 tablespoons prepared horseradish
- 4 large flour tortillas
- 1 head romaine lettuce, tough ribs removed
- 8 ounces thinly sliced deli roast beef
- 4 ounces Cheddar, thinly sliced
DIRECTIONS
- In a small bowl, combine the cream cheese and horseradish. Spread evenly over each tortilla.
- Layer the tortillas with the lettuce, roast beef, and Cheddar and roll up.
Try these on a cold winter Sunday: red pepper–flaked scones made with buttermilk and Swiss cheese.
Crispy tacos get a fresh mix of pinto beans and Cheddar.

INGREDIENTS
- 1 15-ounce can pinto beans, rinsed
- 3/4 cup mild salsa
- 1 heart of romaine
- 8 taco shells
- 1 cup shredded Cheddar
DIRECTIONS
- In a small microwave-proof bowl, combine the beans and ½ cup of the salsa. Microwave on high until hot, 1 to 2 minutes.
- Tear the lettuce into bite-size pieces.
- Divide the taco shells among 4 plates. Divide the bean mixture among the taco shells and top with the lettuce, Cheddar, and remaining ¼ cup of salsa.
Swiss cheese, eggs, and prosciutto are sandwiched together in a crisp, golden Panini.

INGREDIENTS
- 8 large eggs
- kosher salt and black pepper
- 2 tablespoons unsalted butter
- 4 soft rolls, halved lengthwise
- 8 ounces prosciutto, thinly sliced
- 8 ounces Swiss cheese, thinly sliced
DIRECTIONS
- In a small bowl, whisk together the eggs, ½ teaspoon salt, and ¼ teaspoon pepper.
- Melt 1 tablespoon of the butter in a large nonstick skillet over medium heat. Pour in the eggs and scramble until cooked through.
- Divide the eggs among the bottom halves of the rolls. Top with the prosciutto and cheese and sandwich with the tops of the rolls.
- Melt the remaining tablespoon of butter in a grill pan or large nonstick skillet over medium heat. Place two sandwiches in the pan.
- Cook, pressing often with a spatula or placing a pan on top to weigh down the sandwiches, until cheese has melted and bread is golden, 4 to 6 minutes.
- Repeat with the remaining sandwiches.
Monterey Jack melts into scrambled eggs spiced with salsa.

INGREDIENTS
- 1 1/2 tablespoons unsalted butter
- 10 eggs
- 2 tablespoons milk or water
- 1 teaspoon kosher salt
- 1/4 teaspoon freshly ground black pepper
- 1 cup shredded Monterey jack cheese
- 3/4 cup salsa (drained)
- 1 cup crushed tortilla chips
DIRECTIONS
- Heat butter in a large nonstick skillet over medium heat.
- Meanwhile, in a large bowl, whisk together the eggs, milk, 1 teaspoon kosher salt, and 1/4 teaspoon pepper. Pour into the pan and cook, stirring occasionally, to desired doneness, 4 to 5 minutes, adding cheese just before they’re set. Fold in salsa and chips.
This tangy, oozy dish is loaded with Swiss cheese.

INGREDIENTS
- 3 eggs
- 3 cups buttermilk
- 1 tablespoon fresh thyme leaves
- 2 teaspoons kosher salt
- 1/8 teaspoon freshly ground pepper
- 2 pounds baking potatoes, peeled and cut into 1/8-inch slices
- 2 pounds Granny Smith apples (unpeeled), cut into 1/8-inch slices
- 1 pound Swiss cheese, shredded
- 1/4 pound Parmesan, grated
DIRECTIONS
- Heat oven to 400° F.
- Coat a 3 1/2-quart casserole with cooking spray. In a medium bowl, whisk together the eggs, buttermilk, thyme, salt, and pepper; set aside.
- Arrange a layer of slightly overlapping potatoes in the casserole. Cover with a layer of apples and sprinkle with a third of each cheese. Pour a third of the egg mixture on top. Make 2 more layers.
- Bake, covered, 1 hour, 15 minutes. Remove cover and bake another 15 minutes or until the potatoes are tender. Remove from oven. Serve warm or at room temperature.
Everything but the kitchen sink goes into quesadillas finished off with Cheddar or Monterey Jack.

INGREDIENTS
- 1 15.5-ounce can black beans, drained
- 1 11-ounce can corn kernels, drained
- 3/4 cup salsa, drained
- 18-count package large flour tortillas
- 1 1/2 cups (6 ounces) shredded Cheddar or Monterey Jack
- 1 small red onion, thinly sliced
- 1/3 cup fresh cilantro leaves
- 1/2 teaspoon kosher salt
- 1/4 teaspoon black pepper
- juice of 1 to 2 limes
- 2 tablespoons extra-virgin olive oil
- 1 head romaine lettuce, sliced 1 inch thick
DIRECTIONS
- Heat oven to 400° F. In a medium bowl, combine the beans, corn, and salsa. Place 4 tortillas on a parchment- or foil-lined baking sheet.
- Sprinkle the tortillas with half the cheese. Using a slotted spoon, top with the bean mixture. Sprinkle with the remaining cheese; top with the remaining tortillas.
- Bake the quesadillas until the cheese has melted, 5 to 7 minutes. Transfer to a cutting board.
- Meanwhile, in a large bowl, combine the onion, cilantro, salt, pepper, lime juice, and oil. Add the lettuce and toss.
- Cut each quesadilla into 6 wedges. Serve with the salad.
