Category: Favorite Recipes
The Cinnamon Roll: A Heavenly Encounter
When you think cinnamon, you think sweet, you might think of a spice, you might think of bread, pancakes, coffee or even cereal. But the quintessential creation involving cinnamon is none other than the Cinnamon Roll. The ooey, gooey, warm taste of a cinnamon roll on a cold, winter day with a cup of hot cocoa or coffee simply cannot be beat. Cinnamon, sugar and butter, on their own, are relatively mundane ingredients. When they come together, though, is when the fireworks shoot off and we can clearly see the marriage of these ingredients present in every cinnamon roll made on this planet, albeit, different variations of this sweet treat exist.
 Source: https://www.leaf.tv/articles/the-history-of-cinnamon-rolls/
Cinnamon Rolls, while not having been around since the beginning of time, although sometimes its seems very hard to fathom our world every having lived without them, the ingredients used in making cinnamon rolls have been around for millenniums… literally. Bread, cinnamon, sugar and butter have all been around since before the time of Christ. Yeast bread dates back to around the year 1,000 BC and was first discovered in ancient Egypt. Cinnamon is nearly double in age as it dates back to around the time of the birth of Christ, circa 2,000 BC. Cinnamon was often imported from Egypt to China and was very highly regarded to where it was actually passed off as a gift for monarchs of the day. Butter, similarly, dates back to a similar period as cinnamon. Around the middle of the 19th century, machines began taking place of manual labor often done by farmers’ wives when it came to making mass quantities of butter. Finally, sugarcane was first discovered in a region, now called New Guinea. First cultivated in the US sometime in the 1700s, the first sugarcane refinery was built in the late 17th century in New York.
The Birth of the Cinnamon Roll
The very first cinnamon roll was created in Sweden. Cinnamon rolls are so well-acclaimed that it has its own national day, October 4th, National Cinnamon Bun Day. In Sweden, cinnamon rolls are not nearly as sweet and heavy as they are in the US. In Swedish practice, cinnamon rolls are made from dough that contains a hint of cardamom, a ginger-based spice. The cinnamon rolls are baked into muffin wrappers to make a more enjoyable and not so-messy treat.
Behind the Name
In Swedish lingua, “kanelbulle” is the coined term for cinnamon rolls, which literally means, no surprise, “cinnamon bun”. Other names that cinnamon rolls have adapted over its rich history is “sticky rolls” and “sticky buns”. However, with these various names comes various renditions of the original cinnamon roll. Some of these may not even contain cinnamon, but either more of a sugar-based glaze or a honey-based glaze.
Cinnamon Rolls hit the US
They say cinnamon rolls are a very popular commodity for breakfast in the US, but I say they’re great any time of the day. They don’t have to be restricted for breakfast only. One type of cinnamon rolls dating back to the 18th century called the Philadelphia-style cinnamon rolls, containing honey, sugar, cinnamon and raisins. Since the rise of the Philadelphia version, a number of renditions of the famed cinnamon treat have taken the nation by storm in the centuries since.
 Source: https://www.leaf.tv/articles/the-history-of-cinnamon-rolls/
The Best Ways to Eat Cheese: Part 2
This will continue part two of our “The Best Ways to Eat Cheese” miniseries. Who doesn’t like cheese? Who doesn’t like a good miniseries? If you didn’t raise your hand for either of these critical questions, you’re again, in the right place. In the first part of this miniseries, we discussed some of the tantalizing ways that we can infuse cheese in a number of dishes, and even desserts. From cheese-stuffed meatballs to cheese-infused pie crust to a ham and cheese bread bowl, there was something from just about everyone’s taste buds. And, the best part, there were all relatively easy to make and didn’t really break the bank, which is always a great thing!
In part two of this miniseries, we will divulge a number of other foods that we can secretly infuse with cheese that will create a pronounced flavor to an already delicious culinary masterpiece.

Stuffed Peppers… with Cheese!
We’ve all had or even made stuffed peppers at some point in our lives, and if you haven’t, what on Earth are you waiting for? For as delicious as stuffed peppers can be if made with that added touch of TLC, a remarkable version of this dish can created by infusing the meat with your favorite cheese!
Apples and Oats… don’t forget about the Cheese!
When making apples and oats, alone, it is a pretty awesome and dynamic flavor of tart and sweet. Adding cheese to this will create a far more dynamic concoction that will leave your taste buds begging for more. This treat becomes a masterpiece when using Brie as your cheese of choice, infused within the apple and oats, and you actually get that cheese pulling effect every time when using Brie!
Cheese Soup
One of the simplest recipes on Earth is making soup. This recipe can be complex depending on what kind of soup you’re making. Easily heighten the flavor of the soup by either adding cheese to it or making the broth of the soup cheese-based. Here is a great recipe for Beer and Cheese soup
Ingredients
- 2 cups (450g) wheat beer or pale ale
- 3 tbs (30g) cornstarch
- 16 ounces (450g) sharp white cheddar, grated
- 1 cup (240g) broth (vegetable or chicken)
- ½ cup (120g) heavy cream
- 1 tsp (4g) red pepper sauce
- salt and pepper to taste
- ¼ cup chopped chives
- 2 cup (200g) tater tots, cooked according to package directions*
Instructions
- Add the beer, cornstarch, cheddar, broth, heavy cream, and red pepper sauce to a blender. Blend on high until very well combined, about 5 minutes.
- Add to a pot over medium high heat, simmer until warmed and slightly thickened.
- Season with salt and pepper to taste, stir in chives.
- Ladle into serving bowls, top with tater tots, serve immediately.
Source: http://thebeeroness.com/2015/09/23/10-minute-tater-tot-beer-cheese-and-chives-soup/
Cheese with Salad… That Simple!
Take you favorite salad, and add cheese to it. It can be any kind of salad… vegetable salad, green salad, fruit salad, antipasto salad. Just add some of your favorite cheese as a topping or add the cheese another “main ingredient” to the salad. Here is a unique recipe for making Watermelon, Radish, Orange and Goat Cheese Salad
- 1 shallot or half of a small red onion
- 2 to 3 tablespoons white balsamic vinegar
- kosher salt
- 2 to 3 watermelon radishes
- 2 to 3 oranges, clementines, grapefruit, etc.
- a handful of walnuts, toasted and chopped (see notes)
- goat cheese to taste
- chives, minced, optional, but they add some nice color
- olive oil to taste
- Mince shallot. Place in small bowl. Cover with 2 to 3 tablespoons of the vinegar depending on how big of a salad you are making. Add a pinch of salt. Set aside.
- Cut off one end of the radish. Leave the other intact so you have a handle when you run the radish down your mandoline. Peel the radishes if you wish, though it is by no means necessary. Thinly slice on a mandoline. (Note: I ate one slice unpeeled and thought it tasted fine but went ahead and peeled them anyway because I thought the salad might look prettier if they were peeled, but I don’t think it actually really matters.) Arrange radish slices on a platter. I try to fold some of them so they’re not all squished down in one flat layer, but arrange however you wish. Season all over with salt.
- Cut off each end of each orange. Squeeze each end over the radishes, then discard. Use a sharp knife to remove the skin from the orange. Cut in between membranes to remove each slice. Squeeze remaining membrane all over the radishes to extract any juice. Scatter oranges over the radishes.
- Scatter walnuts and goat cheese to taste over the radishes and oranges. Pour macerated shallots and vinegar over top. Drizzle olive oil to taste (one to two tablespoons) over top. Scatter chives over top if using.
- Let sit a few minutes (or longer — it benefits from a brief rest) before serving.
Source: http://www.alexandracooks.com/2014/12/24/watermelon-radish-orange-goat-cheese-salad/
Simply Fry It!
Cheese, in and of itself, is a delicious staple of food. It can come in various sizes, shapes, colors, textures, tastes, ages, among many other variations. Cheese takes on an entirely new level of taste when you decide to fry it. While it may not be the healthiest sound option, it sure is delicious. Sometimes its good to be a little bad, ha! Here is a recipe for Fried Goat Cheese with Honey. That sounds delicious just thinking about it!
- 4 oz goat cheese, cut into eights
- 1 egg
- ½ cup rice flour
- ½ cup club soda
- 1½ cup panko
- Honey, for drizzling
Instructions
- Heat oil in a cast iron pan to 1″ depth over medium heat to a temperature of 375.
- Take each piece of goat cheese and roll in a ball.
- In a shallow bowl, whisk together the rice flour, egg and club soda. Place the panko in another bowl.
- Roll each ball in the egg mixture, then coat with the panko. Repeat the process and then place the coated ball on a piece of wax paper. Repeat with the remaining seven balls. Place in freezer for 10 minutes until firm.
- Drop each ball in the oil, turning until they are golden brown, about 3-4 minutes. Remove to a paper towel to drain, then place on serving plate and drizzle with honey
- Serve immediately.
Source: http://www.gogogogourmet.com/fried-goat-cheese-balls-with-drizzled-honey/
The Best Ways To Each Cheese: Part 1
Who doesn’t like eating cheese? As a culture with a strong, burning passion for food, at or near the top of this list, we often find cheese. Cheese is an overlooked, and often underappreciated food. In can be integrated into countless dishes, or it can be used as a topper for so many more dishes, salads and even desserts. We, as a civilization, never seem to run out of ideas for our uses of cheese. Every day, it seems that culinary experts and chefs around the world are experimenting with different cheeses and dishes in their efforts to create new dishes whose main attraction is cheese, in some way, shape or form.
Let’s taker a gander at some of the more ingenious creations in which cheese is used, or hidden, for that matter. Now, keep in mind, some of these dishes or cheese concealments require a “think outside of the box” approach…
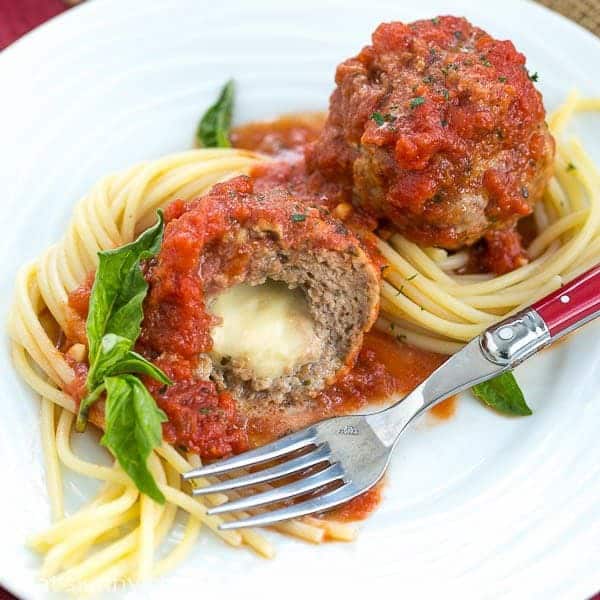
Cheese-stuffed Meatballs
When making meatballs, add some “umpf” to it by integrated some of your favorite cheese when rolling the meat to form meatballs. As the cheese meets the heat when cooking, the cheese will expand and will add an extraordinary flavor to an already delicious meatball.
___________________________________________________________
Ham, Egg and Cheese Crepe
- Make your pancake, as you normally would… the thinner, the better in the case of this recipe.
- When the underside is nearly cooked, place a slice of ham on top, topped off with some of your favorite cheese.
- Fold the sides into to make a square, or as close as you can get to one.
- Break your egg into the space left… leave sunny-side up.
- Squish the sides down with your spatula to seal as the cheese melts.
- Cook for 3 or 4 minutes until the egg is turning white.
- Pop under the grill for a further 2 or 3 minutes until the yolk is just starting to cook, or however you like it. (Although, if you like it any way other than runny you’re way crazy.)
Source: http://www.tamingtwins.com/ham-egg-and-cheese-crepes/
____________________________________________________________
A Cheesy Pie Crust… literally
Making a pie crust with cheddar cheese baked directly into the crust gives it an entirely new dimension of flavor. Try baking an Apple Pie with a cheddar cheese infused crust. Goodness, that sounds absolutely amazing just thinking about it.
_____________________________________________________________
For the Gluten-Free
For those who are in search of gluten-free foods, try using cheese as bread crumbs over zucchini. If this peaks your interest, try this recipe for starters… Parmesan Baked Zucchini.
INGREDIENTS:
- 4 zucchini, quartered lengthwise
- 1/2 cup freshly grated Parmesan
- 1/2 teaspoon dried Thyme
- 1/2 teaspoon dried Oregano
- 1/2 teaspoon dried Basil
- 1/4 teaspoon Garlic Powder
- Kosher salt and freshly ground black pepper, to taste
- 2 tablespoons Olive Oil
- 2 tablespoon chopped fresh Parsley leaves
DIRECTIONS:
- Preheat oven to 350°F. Coat a cooling rack with a nonstick spray such as Crisco and place on a baking sheet.
- In a bowl, combine the following: Parmesan, Thyme, Oregano, Basil, Garlic Powder, salt and pepper. Taste to determine if this meets desired taste.
- Place the quartered zucchini onto prepared baking sheet. Sprinkle olive oil and as well as Parmesan mixture.
- Place into oven and bake until tender. This usually takes ~ 15 minutes. Then broil for around 2-3 minutes, or until crisp and golden brown.
- Serve immediately. Garnished if that is your thing…
Source: http://damndelicious.net/2014/06/21/baked-parmesan-zucchini/
___________________________________________________________
Cheese-Infused Loaf of Bread
This is quite the old-fashioned move, but as they say, “an oldie but goodie” and this no doubt falls in this league. When baking a loaf of bread, step up your culinary game and inject a concoction into the center of the bread; a concoction of your favorite cheese, spices, herbs, etc. Bake and enjoy!
____________________________________________________________
More Cheese… More Bread
With the Cheese-Infused Bread in the back of your mind, try this cheese creation on for size. The Bread Bowl of Cheese is another cheese creation, or should I say, masterpiece, that is in yet another league of its own. Try this recipe…
INGREDIENTS
- 4 bread rolls (soft or crusty)
- 4 small slices of ham, or 2 big ones cut in half
- 4 eggs, at room temperature
- ½ cup shredded mozzarella cheese
- 1 tbsp fresh parsley, finely chopped (optional)
INSTRUCTIONS
- Preheat oven to 350°F.
- Cut tops off the bread rolls.
- Scoop out the center of each bread roll and reserve. Although this can be quite an intricate step in the overall recipe, try to keep your cuts and scoops nice and neat.
- Line the bread bowl with a layer of ham, using a single slice or multiple slices as needed.
- Crack in an egg. This is the part of the recipe where Humpty Dumpty came to mind with me.
- Top each with 2 tablespoons of Mozzarella and a sprinkle of parsley, if desired.
- Put the tops back on each roll. Wrap with foil and place in oven to bake for ~10 to 15 minutes, making certain to check periodically, ideally, in 10 minute intervals.
- 10 minutes = very runny yolks. 15 minutes = firm just cooked yolks. 15 minutes + = very cooked yolks.
- Remove from oven, unwrap, serve immediately and enjoy heaven in a bowl.
What is the Perfect Cheese For Pizza?

September 5th marked a day of celebration for America, and perhaps, even much of the world… because who doesn’t like pizza and cheese or both? Unknown to many is that September 5th is National Cheese Pizza Day. You know with the birth of smartphones and mobile apps came the phrase “…there’s an app for that”, well in similar light, if you love a food or, in this case, a combination of foods, a new axiom may take shape here, “…there might just be ‘National’ day for that”. A day that puts the focus of pizza and cheese, two delicious foods in and of themselves, but when together, spark a whole new revelation of culinary marvel… who would not love a day just to celebrate such a marvel? The answer should be simple… no one.
There has been an age-old question that continues to make the mind wonder and wander, that is… “Is there a perfect cheese to put on pizza?” Dr. Bryony James, a scientist whose research centers on food microstructure and food material science in New Zealand at the University of Auckland dove right in to find an answer the this question. Dr. James’ team of scientists study the building blocks of food and even experiment with structural composition of various foods that can influence its functionality. Ideally, their line of scientific research would allow them to develop a potential hypothesis for such an experiment. As the team began initial studies of the “best cheese for pizza”, they already knew that, historically, Mozzarella was highly favored and the most commonly used cheese for pizza topping.
Among countless scientific trials and experiments, the team researched cheese based on browning and blistering. These variable were designated as focuses of research as they were found to be the most looked upon features by consumers. Examining the properties, features and characteristics of cheese could potentially lead to further discoveries of the ideal cheese or in some cases, the ideal combination of cheeses to use on pizza. Other cheeses the group extended their research to was Cheddar, Colby, Emmental, Gruyere and Provolone. The actual experimentation itself was conducted by state-of-the-art technology, as opposed to human hands. As human judgment would have been idea over the work of a machine, it would have been far more time-consuming and brought the idea of a “bias” trial or opinions when bringing human emotion and interaction into the picture.
Of the properties of cheese that were measured for this experiment, smell, texture, melting properties and color were at the forefront. Researched revealed that some cheeses like Cheddar did not produce a favorable level of blistering while the likes of Gruyere did not properly brown after melting, which can be attributed to the oil content within the cheese. The results clearly indicated that although Mozzarella might be the traditional favorite cheese topper for pizzas, there might not be that “perfect” cheese or combination of cheeses, as each cheese’s characteristics and properties, when undergoing melting, might be desirable for one consumer, but desirable for another.
Source: http://www.cheeserank.com/post/the-science-of-pizza-cheese
Is Cheesecake Made From Real Cheese?
You are at your favorite restaurant and you order something off the dessert menu. None other than universal go-to and favorite, cheesecake. Then you begin thinking to yourself, why do they call it cheesecake when the main ingredient in the cheesecake is cream cheese? Why not call it Cream Cheesecake? Well, truth be told, while some use cream cheese to make cheesecake, many other parts of the world use actual cheese to create this one-of-a-kind dessert masterpiece. There are actual a number of cheeses that different parts of the world use to make their own version of [real] cheese cake.

Cream Cheese
Cream cheese was first created in the 19th century across the United States. Having many styles and variance, cream cheese was first made my local dairy farmers in Philadelphia, Pennsylvania. Later, in the 19th century, William A. Lawrence, a Chester, New York dairyman bought a Neufchâtel factory. Neufchâtel is a softer cheese that is native from France for centuries. Lawrence, however, decided to take an additional step by adding more cream during the Neufchâtel-making process causing the cheese to become richer and heavier. He termed this “cream cheese”, and how fitting the name was. The majority of cheese cakes across North America are made with the base of some type of cream cheese giving “typical” cheese cake that rich, creamy texture.
Sour Cream
Seriously?? While sour cream is not a cheese, it is a dairy byproduct of fermenting cream. Because of its smoothness and creaminess, it is often added to the cream cheese base that is used in cheese cake to make it creamier and thicker. Yet, other renditions of the dessert may feature a strictly-cream cheese base with a sweet, sour cream topping, usually in plain form or with lemon shards adding an extra bite or or layer of flavor.
Quark
Across various parts regions of Europe, quark is the go-to ingredient when making cheese cake. Because it is native to parts of Europe, cheese cake made from quark is often termed “German-style” or “Bavarian” cheesecake. Like Sour Cream, quark is made from the fermentation of milk. It has a creamy and yet a bit crumbly in texture and often has curds. Unlike cottage cheese, also having curds, quark is not made with rennet (as cottage cheese is) and salt, at times.
Ricotta
Here we have the real deal. I, personally, have had cheesecake made with Ricotta and I can tell you that it is the best cheesecake I have ever had. Besides its most common use in Lasagna and Manicotti, Ricotta is used to make cheesecake. While it is made in the United States as well, it is referred to as “Ricotta Pie” here in the states. Other versions of Italian cheesecake might use Mascarpone, a very soft Italian cheese often used in Tiramisu.
A Taste Of Heaven: Sharp Cheddar Mac N’ Cheese with Bacon

Cooked bacon adds smoky flavor to the cheese and bread crumb topping in this flavorful and creamy macaroni and cheese casserole. Feel free to make it without the addition of green onions. I thought they went well with the bacon flavor, but if you’re not a fan of onions, you can leave them out. Serve this macaroni and cheese with sliced tomatoes or a tossed salad for a satisfying family meal.
INGREDIENTS
- 8 ounces elbow macaroni, about 2 cups dry
- 3 tablespoons butter
- 4 green onions, thinly sliced
- dash garlic powder
- 1/4 cup all-purpose flour
- 2 1/2 cups milk
- kosher salt and freshly ground black pepper, to taste
- 6 slices bacon, cooked, drained, crumbled
- 2 cups (8 ounces) sharp Cheddar cheese, divided
- Topping
- 1 cup soft bread crumbs
- 1 1/2 to 2 tablespoons butter, melted
Prep Time: 10 minutes
Cook Time: 40 minutes
Total Time: 50 minutes
Yield: 4 to 6 Servings
PREPARATION
Cook macaroni in boiling salted water following package directions. Drain the macaroni in a colander, rinse with hot water, and set aside.
Heat oven to 350° F (180° C/Gas 4). Lightly grease a 2 1/2-quart baking dish.
In a medium saucepan over medium heat, melt the 3 tablespoons of butter. Add the green onions and garlic powder. Cook, stirring, for about 1 minute. Add the flour and stir until well blended and smooth.
Continue cooking, stirring, for 2 minutes. Gradually add the milk and cook, stirring, until thickened. Stir in salt and freshly ground black pepper, to taste.
Set 1/2 cup of the shredded cheese aside and stir the remaining 1 1/2 cups of cheese into the sauce. Continue cooking and stirring until the cheese has melted.
Combine the cheese sauce with the drained macaroni and then spoon the mixture into the prepared baking dish. Sprinkle bacon evenly over the casserole and then top with the reserved 1/2 cup of cheese.
Toss the bread crumbs with 1 1/2 to 2 tablespoons of melted butter and sprinkle over the casserole. Bake for 25 to 30 minutes, until lightly browned and bubbly.
Stop by Shisler’s Cheese House and let us help you make this tasty lunch or dinner creation with our supply of smoked bacon and sharp cheddar!
Healthy Eats: Bocconcini Salad With Figs & Pears

Making cheese is a simple process. Take some fresh milk and heat it up to 45-50 °C, add an acidic component like lemon juice to curdle the milk, strain the off the liquid whey and you have cheese. This process has remained unchanged since the beginning of cheese-making time.
Scientists have analyzed the residual fatty acids found in unglazed pottery discovered from around Europe. The results showed that humans have been making and consuming bovine based cheese products for more than 7,000 years. The pottery, which is perforated, is believed to have been used as a cheese sieve or strainer.
Seven thousand years ago we were beginning to smelter metal, invented the wheel and for the most part the human populace was lactose intolerant. Lactose intolerance happens when the small intestine does not make enough of the enzyme lactase. This enzyme is essential in the digesting of lactose, a naturally occurring sugar present in all dairy products.
Somehow we had discovered that the cheese-making process allows for maximum nutrient absorption from the milk while drastically reducing its lactose content, allowing the lactose intolerant populace to consume it without getting sick.
True mozzarella cheese is made from buffalo milk curds kneaded and pulled while repeatedly dipped in hot whey. They are hand shaped into tennis-ball sized bals. This process yields a cheese that has a spongy texture that easily absorbs the flavours of other ingredients.
These cheese balls are then packaged in salted whey to preserve them. Clearly I’m not speaking about the rubbery blocks of North American, factory produced mozzarella. When the mozzarella is shaped into smaller balls it’s known in its singular as bocconcino or its plural as bocconcini, which translates to little mouthfuls in Italian. In essence, bocconcini are small pieces of fresh mozzarella.
Goat’s milk is slowly becoming more popular in Canada, mostly due to the increase in those individuals who are lactose intolerant. Although goat’s milk is not free of lactose, it does have less than cow’s milk, making it easier to digest.
As well, goat’s milk forms a softer curd and does not need to be homogenized, as the fat globules are small and well-emulsified, which means the cream remains suspended in the milk instead of rising to the top, as in raw cow milk, once again making goat milk easier to digest.
So what happens when we make bocconcini from goat’s milk? We get a soft textured cheese that is easy to work with and has an exceptionally reduced amount of lactose, and who better to make this cheese than the Kawarthas’ very own Crosswind Farm?
I suggest trying this week’s recipe provided by Judy Filion, a Crosswind Farm employee and up-and-coming area chef.
Baked Bocconcini with Fig and Pear Salad
- 1 pound Crosswind Farm Bocconcini
- 1 ½ cups bread crumbs
- 10 roasted figs, cut in half
- 2 pears, cored and sliced in thin wedges
- 2 lbs arugula or mixed greens
- ¼ cup toasted almonds
Drain the bocconcini of its excess oil and liquid. Place bocconcini and bread crumbs into a plastic bag and gently massage the bread crumbs into the bocconcini. Spread the bocconcini onto a parchment lined baking sheet and let them rest in the refrigerator for 2-4 hours.
In a preheated oven, bake the bocconcini at 450°F oven until lightly browned, about 7-10 minutes. Remove cheese from oven and allow it to cool down. While the cheese is cooling prepare the remaining salad ingredients by gently grilling the figs on a barbecue or roasting them in the oven. In a medium-sized bowl toss the leaves with a bit of balsamic vinegar and olive oil. Dress the top of the salad with bocconcini, figs, pears and almonds and serve immediately.
Yields: 4-6 portions
Chicken Paprikash: Old-Fashioned Never Lost Its Touch!
When 16th century explorers began sending new foods back from the Americas, it was as if a giant cornucopia had been emptied over Europe. Italy and Spain made tomatoes a staple of their cuisine, potatoes found a home in northern Europe and Turkey began raising and exporting red peppers, which the Hungarians found a perfect match for their soil and, eventually, their cuisine. The peppers’ odyssey eventually lead to Hungarian paprika and Hungarian paprika lead to one of the world’s great peasant dishes –Chicken Paprikash.

What is Chicken Paprikash?
“Paprikash” comes from the Hungarian word for paprika, and describes a range of stew-like dishes made with meat, onions, lots of paprika, and sour cream. Tomatoes are not found in the authentic Hungarian dish, which gets all of its red-orange hue from paprika, but you will hardly find a paprikash anywhere in American that does not include tomatoes. Though chicken seems to have been the original meat used in paprikash, lamb, pork and especially veal are also used, and mushrooms make a good meat substitute for vegetarian versions. Traditionally, Chicken Paprikash is served with dumplings, but wide noodles have now become equally common.
The History of Chicken Paprikash
Although it’s agreed that Chicken Praprikash is an authentic Hungarian dish that dates back several centuries, there are no precise details on when it entered the cuisine mainstream. My belief is that, unlike goulash, which was invented by trail herders on the move, Chicken Paprikash originated among the farmers of southern Hungary. This rich, sunny agricultural district supplied the peppers from which paprika is made, and two towns in the region – Kalocsa and Szeged – are known for their excellent paprika. The fact that this originated as a chicken dish also argues for its farm origins. Paprikash, like “coq au vin”, is a dish designed to use up older, tougher birds past their prime – a protein source always available on farms.

It’s All About the Paprika
Paprikash is one of the few dishes in the world that takes its name from a spice – in this case, the spice that became the backbone of Hungarian cuisine. Originally imported from Turkey, the peppers that are dried and ground into paprika have been grown in southern Hungary for nearly 500 years.
In America, paprika comes in two varieties, sweet and hot. In Hungary, where growers and manufacturers blend paprika with the care of vintners blending grapes for wine, there are seven official gradations. From mildest and sweetest to the strongest and spiciest, they are:
- Special Quality
- Exquisite Delicate
- Pungent Exquisite Delicate
- Rose
- Noble Sweet
- Half-Sweet
- Strong
If you want to make paprikash, goulash, or any other dish involving paprika and the jar you have has been sitting around for a year or so because you only use it as a garnish, leave the old stuff on the shelf and buy a fresh can of the high quality imported stuff. The taste difference is well worth the relatively small expense.
How To Make Chicken Paprikash
As I noted earlier, Chicken Paprikash can also be made with lamb, veal, pork, or with a medley of vegetables like mushrooms and carrots. It’s an easy dish to make no matter what meat you choose, and is made essentially the same way, whether you try the original Hungarian Chicken Paprikash recipe without tomatoes or the more familiar version with tomatoes (which Hungarians call Chicken Paprika Stew).

To make Chicken Paprikash, begin by browning onions in a little oil, then add meat, brown, then reduce the heat and add paprika just to warm the spice. Add water or broth – and tomatoes if you’re using them – then cover the pot and left it simmer until the meat is fully cooked and tender.
The final touch is adding the sour cream just before serving. Here, I deviate from standing procedure a bit. To me, one of the joys of paprikash is the deep, jewel-like ruby-red color of the sauce. I like to let that shine. So I leave the sour cream out, ladle the paprikash over individual bowls of wide noodles, and finish each with a dollop of sour cream, which I’ve let warm to room temperature and stirred well so it won’t come off the spoon in a cold, unattractive lump.
For a final touch, garnish each bowl of paprikash with little chopped parsley and there you have it… the color of the flag of Hungary: red, white and green! Enjoy!
Let Shisler’s Cheese House help you create this succulent, dish with our supply of Paprikash Sauce from
Raclette: The Perfect Melting Cheese

Raclette is very popular in Europe, especially in the Swiss Alps and other ski regions. And that’s where it’s said Raclette came from.
While Switzerland supplies 80% of Raclettes, French Raclettes are slightly softer with a smooth and creamy flavour. Raclette is also the name of a Swiss dish where the cheese is melted in front of a fire or a special machine and the melted parts are scraped onto diner’s plates. It is then served with small potatoes, gherkins, pickled onions and air-dried meat called Viande des Grisons. Raclette comes in round and square shapes and can be served with Vin de Savoie.
Today, few houses have an open fireplace, so to simulate the process we now have Raclette Melter that hold a block or half wheel of cheese under a heating element. Once melted, the cheese is being scraped off onto the prepared potatoes.
Another variety is a Raclette Grill, which allows melting individual portions of cheese and offers a grill top to serve grilled vegetables, meat, chicken, or fish with the cheese. Many of these models come with a reversible grill top that can be used to make crepes or pancakes. And yet another variety can be converted into a mini pizza oven.
A Traditional Raclette Recipe
This simple raclette recipe should be the first you try on your raclette grill or raclette melter. Serves 4
- 8 small/medium potatoes
- 1.5 lb. Raclette Cheese
- Buendnerfleisch (cut in paper-thin slices)
- 1 jar pickled gherkin cucumbers (cornichons)
- 1 jar pickled onions
- freshly ground pepper
- paprika
Wash potatoes and, with skins on, boil in a pot filled with salted water for about 20 min. Test with a knife if the potatoes are done. Keep warm until ready to use in an insulated potato basket. In the meantime remove the rind of the cheese and cut into 1/16″ thick slices using a adjustable wire slicer. Arrange gherkins, onions, and Buendnerfleisch on a platter and set aside until required. Turn raclette on to begin to heat up (allow for at least 5 minutes before using). For raclette grills: Each guest takes a slice of cheese, places it in their pan and slides it under the raclette grill to melt. It takes approximately 2 minutes to melt to a creamy consistency and 3 minutes for a more crispier top. In the meantime take a potato, place onto your plate and cut it into a few pieces, remove the pan from under the grill once it’s reached its preferred consistency and hold the pan onto its side to scrape the cheese out, using your wooden spatula. For raclette melter, each guest prepares potatoes and side dishes on their plates. When the cheese starts melting on the wheel, scrape the cheese onto the plate. Season to taste with freshly ground pepper and paprika. Pair Grand Cru Raclette with Pinot Grigio, Fendant, a Swiss white wine, or a light, fruity red wine, such as Beaujolais.
Let Shisler’s Cheese House help you make your next memorable melt experience with our supply of Raclette Cheese!
Jarlsberg: A Norwegian Experience And The Largest-Selling Imported Cheese In The US

Jarlsberg is often referred to as a type of Swiss or Baby Swiss cheese. It actually originated in Norway, but it’s a direct descendant of the great Swiss Emmentaler — the classic “Swiss” cheese with the large holes.
So, the story goes, Emmentaler cheese was introduced into Scandinavia around 1830, and within 20 years the Norwegians had adapted the recipe and were producing their own nutty, waxy, large-holed cheese in the county of Jarlsberg.
As the 20th century progressed, however, the holes started to disappear, even though the same manufacturing process was used. Food scientists finally figured out that the eyes and particular flavor of Emmental-style cheese were the result of a bacteria called propionibacterium, which was naturally present in the milk.
This particular bacteria eats away at lactic acid and produces carbon dioxide as the cheese ages, which forms the familiar air bubbles in the cheese. This would explain why neither Emmentaler nor Jarlsberg has a tangy taste.
As dairies began to be more concerned with sanitation and the milk began to undergo pasteurization, most of these bacteria were killed off, changing the nature of the cheese.
The modern version of Jarlsberg we find today was developed in the late 1950s at the Dairy Institute at the Agricultural University of Norway. This was a center of cheese research, and Jarlsberg was retooled to be a cross between Norwegian Gouda and Emmental, a smaller, softer, sweeter version of the Swiss mountain masterpiece.
The researchers began adding the propionibacterium back to the milk, selecting for a new strain that was compatible with the higher salt content of a Gouda.
Eventually they got it right, and Jarlsberg, by the pound, is the largest-selling imported cheese in the United States today. It is produced according to the very scientifically-controlled recipe in Norway, under license in Ohio (using the special bacterial culture shipped from Norway), and in Ireland by Diarygold.
Wheels of Jarlsberg cheeses are far smaller than Emmentaler, weighing about 22 pounds compared with Emmental’s 150-pound or larger wheels.
If you enjoy Jarlsberg, it is available online in light, 1-year aged, and smoked varieties.
Jarlsberg is available in most grocery cheese cases, is not terribly expensive, and is very suited to cooking. Anywhere you would use Swiss cheese, try Jarlsberg.
Jarlsberg-Potato Dippers
INGREDIENTS
1 Jarlsberg Lite cheese
1 cup instant potato flakes
½ teaspoon each black pepper and garlic powder
1 cup vegetable or chicken broth
DIRECTIONS
1) Preheat oven to 375°. Mix cheese with potato and seasonings; add broth and mix.
2) For lacy, crispy dippers, sprinkle mixture evenly on parchment-lined or (oil-sprayed) foil lining a 10×10-inch baking pan. Bake 25 minutes or until brown around the edges. Break into free-form pieces.
3) For a more solid, flexible dipper, spread mixture on parchment or foil, patting down for an even layer. Bake 35 minutes or until beginning to brown. Invert on wire rack, peel off parchment and return to pan to bake 10 minutes more. Cut into 2-inch squares. Serve with your favorite salsa. Makes 25 pieces.

