Category: Cheese Facts
Creating Mouthwatering Halloumi
Halloumi originates from the island of Cyprus and tends to be a semi-hard, unripened, and brined cheese. It is unique for having a high melting point which means it can be easily grilled or fried- perfect for summer cookouts! What makes it better is because it doesn’t melt, it keeps its texture and shape, keeping the incredible flavor and soft insides.
Although Halloumi has been around for a long time, it is particularly getting more popular over in the western countries because there has been a rise in vegetarians, it acts as a delicious meat substitute.
This cheese is traditionally made with ewe’s milk and added cow’s milk, but it is perfectly fine to make it with just 100% cow’s milk since that is more readily available. You can even substitute the milk for your own desired type. In this recipe though, 1 gallon of cow’s milk will be used for a trial run to see if you enjoy the cheese, ingredients can easily be adjusted to fit the amount of milk you would like to use.

Recipe
What You Need
1 Gallon of Milk (not ultra-pasteurized)
1/4 Tsp Single Strength Liquid Rennet (1/8 tsp for raw milk)
1 Pack C21 Buttermilk Culture or 1/4 tsp MA4002 (no culture for raw milk)
3/8 Tsp Calcium Chloride for Pasteurized Milk
1/8 Tsp Citric Acid (for Whey Ricotta)
1/2 oz Salt
Equipment
Knife to cut curds
Large colander
Ladle or spoon to stir curds
Thermometer
What To Do
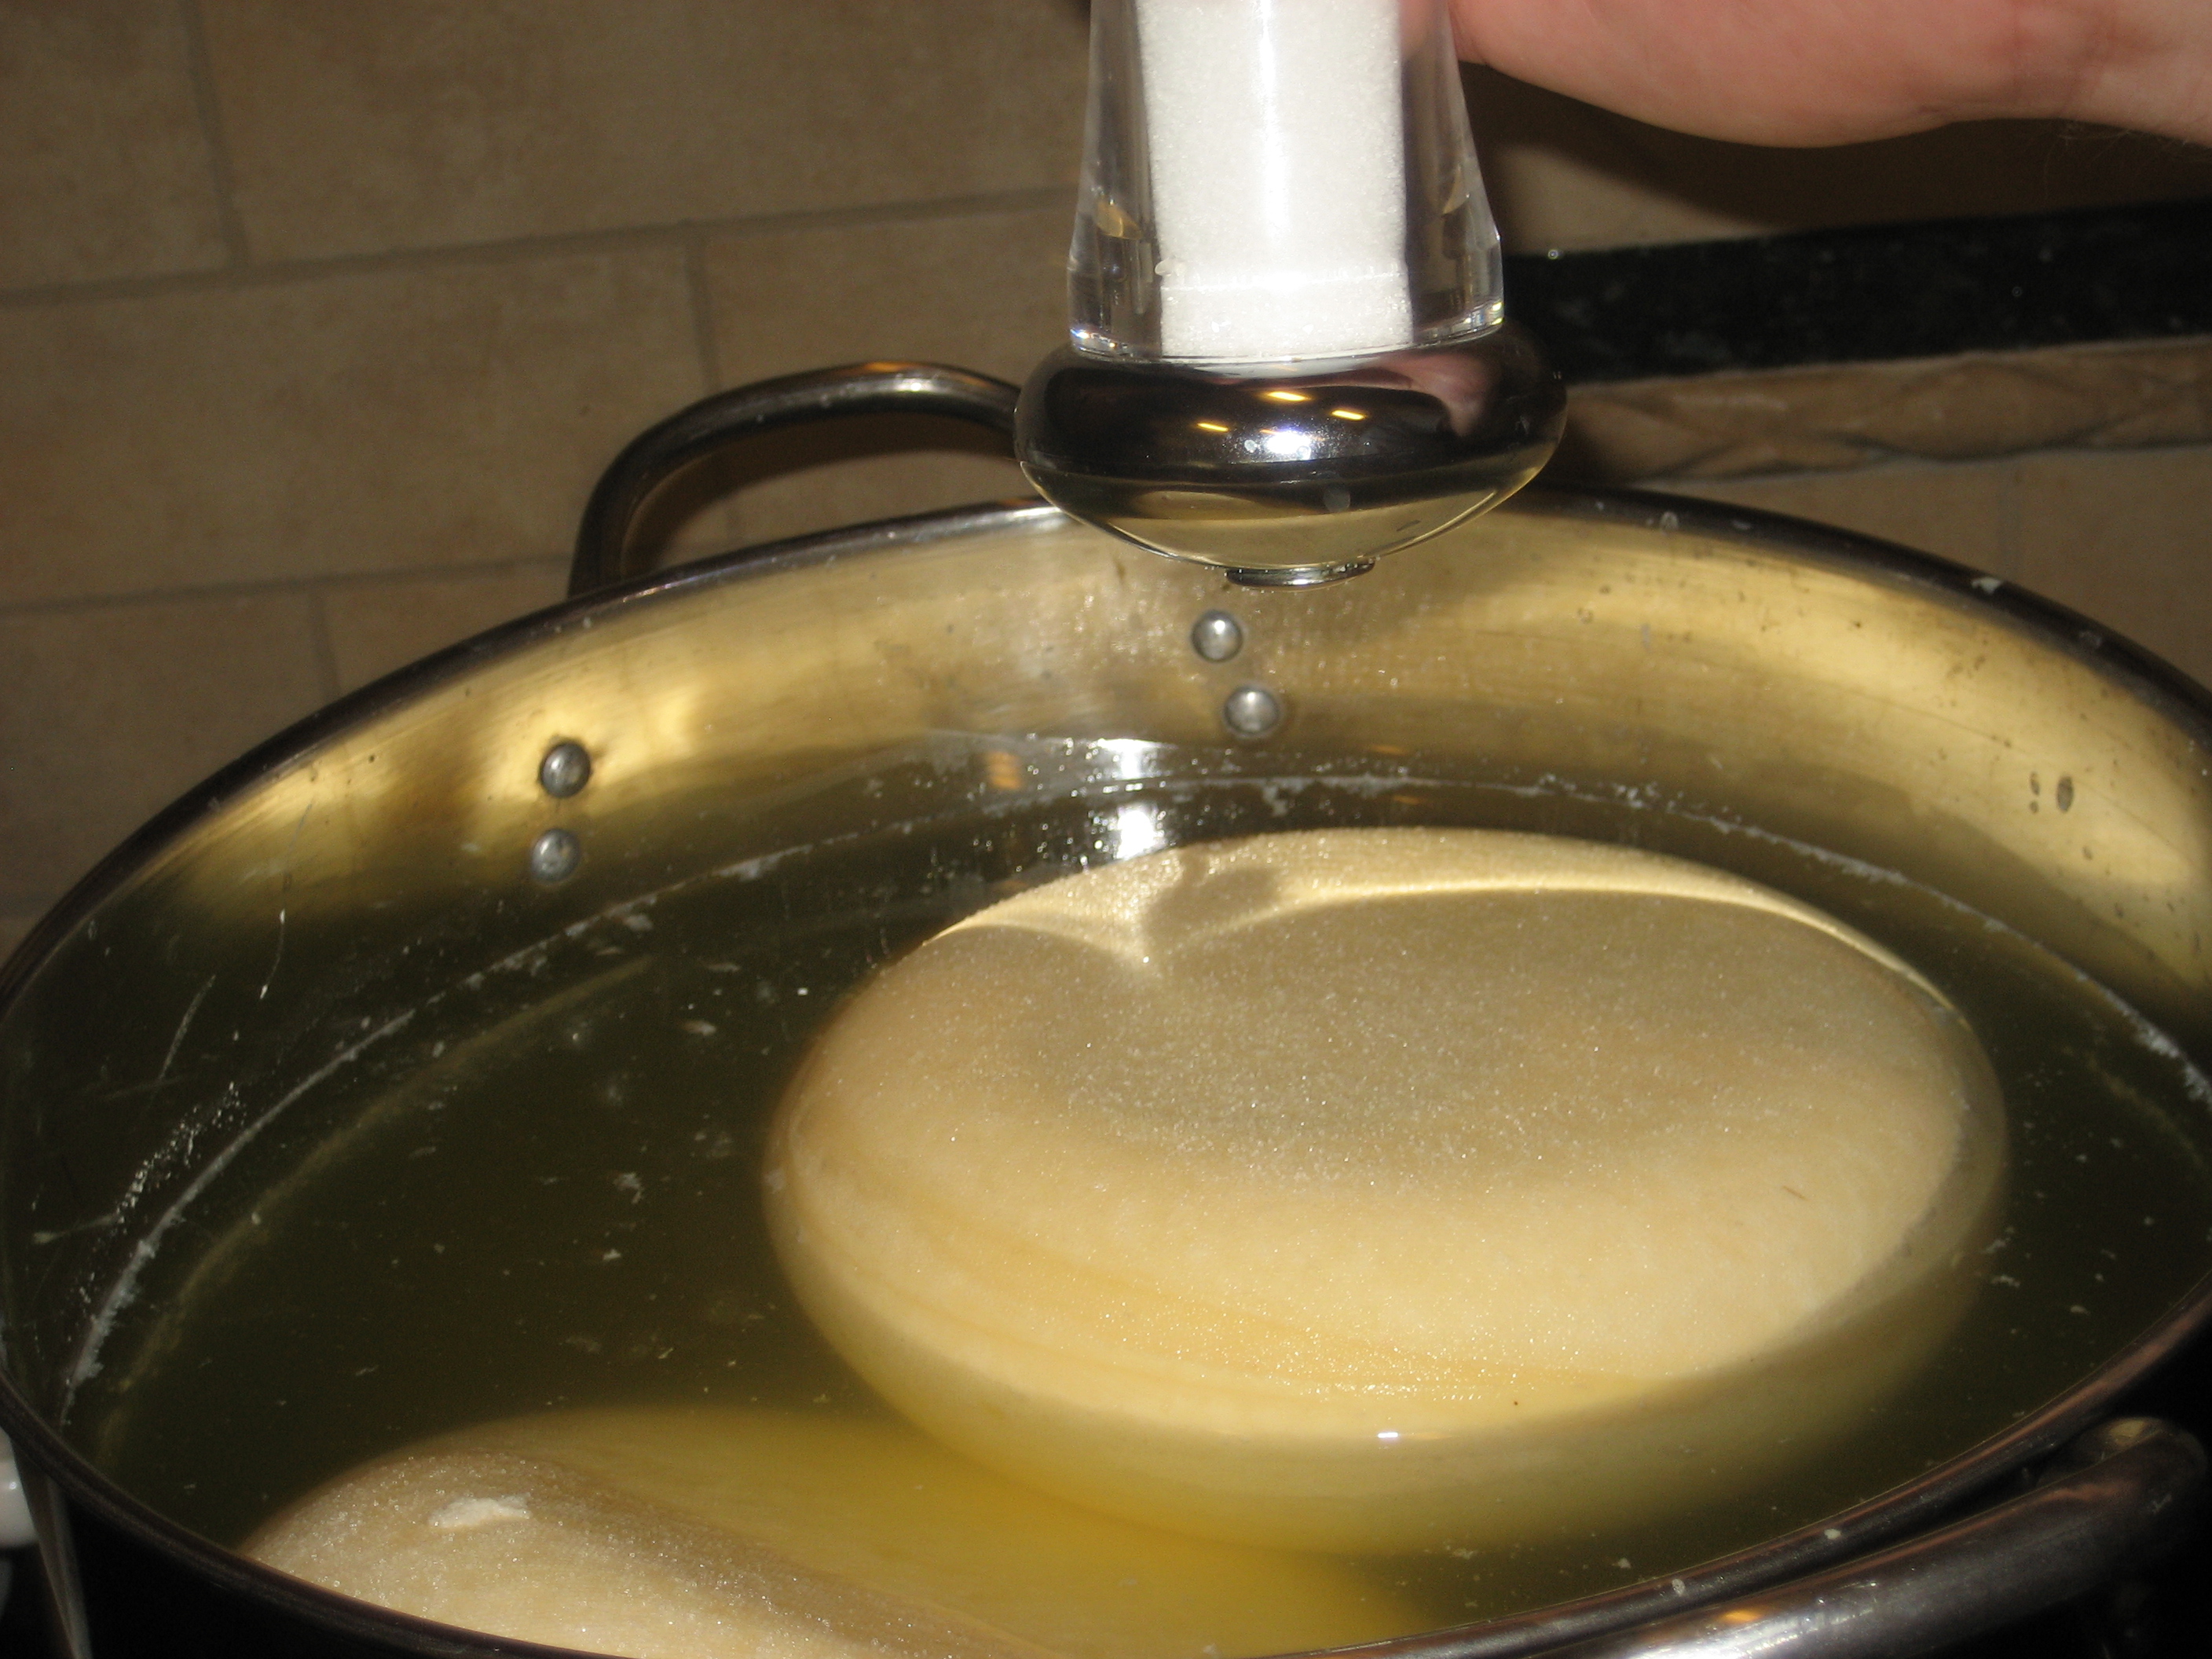
1. To begin, place your milk in a pot and heat it to around 88 degrees F. Be sure to hear slowly and stir well if heating on a stove.
Once your milk has reached the desired temperature, add the culture. The culture will be destroyed by the milk and the curds will become higher in temperature. However, they will provide special enzymes for ripening if the cheese is preserved for a short period of time.
Also, if you are adding calcium chloride or lipase, add them in this step and stir to incorporate it well into the milk.
2. Now, add the liquid rennet to a diluted 1/4 cup of water. This will begin the coagulation process. It will take approximately 30-40 minutes for total coagulation but you will notice the milk begins to thicken within 20 minutes.
3. The curds can now be cut to .75- 1.5 inch squared in a vertical manner. Then allow to stand for 5 minutes to heal and then using your ladle, cut horizontally into even sized cubes.
4. Time to cook the curds and remove the whey. Stir gently, increasing the heat slowly to 100 degrees F during 20-30 minutes.
Keep this temperature for another 20-30 minutes while stirring every 3-5 minutes.
Once that time period is over, allow the curds to settle for 5 minutes under the whey.
Cooking the cheese in hot whey is very important for the making of Halloumi, so beginning to filter off the whey from the curds is the next step. You can do this with a sanitized colander and just scoop the whey out with a ladle, cup or bowl.
Now that the whey has been separated, slowly heat the whey to 195 degrees F, without letting it boil.
5. The curds which are dry can be transferred to their form from draining. Light pressure from your hands will help the consolidation of curd and make more than 1 form, they can be stacked and reversed for a little weight.
You can allow the curds to rest with a little weight, stalking them in forms. Make sure you turn them at 20-minute intervals to form a well-consolidated cheese.
6. After the whey has been heated, it is time to give the Halloumi its true form by heating the whey for 30-40 more minutes, keeping it at a temperature of 195 degrees F for the time it takes to cook all the pieces of Halloumi. Use a ladle to keep the cheese off the bottom of the heating pot and then lower it into the whey. At first, the cheese will float to the bottom, but as it cooks, it will eventually float to the surface.
Once it floats, that means it is ready to be removed. Cool the cheese for a few seconds in cold water and then lay it on a draining mat to cool and drain a bit more.
7. While you are cooling the cheese, and it is still warm, flatten with your hand to form a larger, flatter disc of cheese.
Now finish it off by sprinkling the cheese with salt and folding it into a crescent and pressing slightly as it cools.
8. Now your cheese is done, after a 3-5 day process. You can keep it refrigerated if it is lightly salted. If you are wanting to store it more traditionally, at room temperature, the higher amount of salt will keep it well for several days.
Important How-To’s On Cheese Making Part Three: Bandaging Cheddar
So you’re done making your delicious cheddar cheese, the curds are pressed and you’ve removed the cheddar from the mold, it is time to bandage your cheese! Here are some useful directions that will allow for a perfectly bandaged block of cheddar, ready to age.

1. You can begin by cutting 2 circles of muslin cloth which is just slightly bigger than the top of the cheese. Now melt some lard or butter (lard is better for binding) and soak the cloth in it. This is to help the cloth to adhere to the cheese surface. Be sure to wring the cloth of excess.
2. Next, spread the cloth evenly over the surface and smooth it out from center to the edge.
3. After that, bandage the other end and repress it for about an hour at max pressure.
4. Now the side should be finished in a similar manner to the top. Put it back to press overnight.
5. Once you have removed the cheddar from the press, it will be wrapped in cloth and ready to age for around 8-24 months. To ensure this goes successfully, the cloth must be airtight and well pressed against the surface of the cheese. You should wipe away the excess lard/butter from the surface of the bandage before you place it in the cave.
6. You can now place it on a shelf in the cave at 55F and 85% humidity. Turn it once a day for the first 8-12 weeks.
7. The first natural molds will begin to show after the first 2-3 weeks. These will continue to grow and spread over time. You should begin turning only two times a week after 2-3 months of aging.
8. The mold will eventually dry off as the moisture of the cheese decreases, leaving the surface quite rustic after 8-12 months.
Important How-To’s On Cheese Making Part Two: Salt Brining Cheese
The main reason that cheese makers salt brine their cheese is to slow down or completely stop the bacteria process of converting lactose to lactic acid. A lot of lactose is removed during the process. If cheesemakers were not to salt the cheese, the residual moisture will contain enough lactose to produce more acid than ideal for proper curd ripening. Another reason for salt brining is for the cheese flavor.
The moisture is also pulled from the surface to begin forming the rind of the cheese when it is salted. This also tends to allow many molds to grow.

How To Brine Cheese
Firstly, we need to determine when to salt the cheese. Cheese will be ready for brining once the final pressing has been completed and the cheese has been moved to a cool cave to stabilize the temperature. If you were to brine warm cheese, it will cause the rate of salt absorption to increase which ultimately causes over salting.
Once your cheese is ready and prepared, pour your brine into a none reactive pan. Here is a good, simple brine formula if you don’t have any brine in mind:
Add 2 lbs of salt to 1 gallon of water, then add 1 tbs. calcium chloride (30% solution) and 1 Tsp. white vinegar.
The result of that will be saturated brine at 5.2 pH, suitable for most cheeses.
Once the brine is in the pan, place your cheese into it. The cheese will float because of the density of the brine, resulting in the surface of the cheese rising out of the brine. You have to keep this in mind because the surface of the cheese will not get salted during the brine process like the rest of the cheese. To fix this, you can simply add a small amount of salt to the surface of the cheese. This will allow your cheese to form its own brine because of the surface moisture.
How long it takes to brine cheese varies depending on the shapes and densities of the cheese. A general tip is to brine for 1 hour per lb. per each 1 inch thickness of cheese. For example, a dense low moisture cheese like Parma will need more time than a moist open texture cheese.
How you should handle cheese after brining is an important step also. It should be drained and allowed to air dry for a day or so, turning it when needed. Once the surface is dry and firm, the cheese can then be waxed or the process for developing natural rind can begin.
Other Useful Information Surrounding Salting With A Brine
How much salt is enough?
Adding salt until the salt no longer dissolves when added is the way to go. This means the brine is made up of a saturated strength.
How do you make the brine as good as possible?
Keeping the brine as cool a temperature as possible is ideal for the brine. A lot of the time people keep it at around 50-55F and store it in the cool cave area to keep it cool.
How long will the brine keep?
Brine can keep for around a year or two. Even if it gets moldy or looks bad, you can just bring it to a boil and re-filter it.
Generally, good brine gets better with time.
Important How-To’s On Cheese Making Part One: Testing Acid
When making cheese, it may never have occurred to you just how important the process in which we test for acid is. At the point where we are trying to convert the lactose in cheese into lactic acid by using cultures, we can never truly determine if it is working in the way which it is intended to. This is why tracking acidity levels are one of the most accurate ways to know if your culture is working or not.

Equipment Needed
It is actually relatively easy to test for acid and you only really need two basic pieces of equipment in which you can find online:
Acid Testing Kit

Using inexpensive acid testing kits, you can easily test the acidity of cheese whey, milk, and other dairy products. It is important to invest in one of these kits because increasing acidity levels is an extremely important stage in cheese making and the kit completely eliminates guess work, to ensure delicious results, as intended. Acid testing kits are generally preferred by home cheese makers who won’t be using it frequently
Acidimeter

The acidimeter is for more of a serious home cheese maker or farmstead cheese makers who will be making these tastes quite often. Acidmeters make taking titration readings fast and effortless. A small screw clamp allows you to preset drop speed for repeat titration and a squeeze of the bottle will refill the burette back to the zero point.
How The Test Is Done
Depending on which test you are using, here are directions on how to perform these acidity tests:
1. If you are using the acidimeter, fill the glass reservoir with .1N NaOH (Sodium Hydroxide Solution).
2. Then (still using the acidimeter), fill the graduated column with the NaOH by applying pressure to the rubber pump. It will go back to zero with any excess draining going back into the reservoir.
If you are using the acid testing kit, fill the syringe with 3 ml of .1N NaOH
3. You then use a syringe or a pipette and measure out 9 ml of milk.
4. Now pour the sample into a test tube or beaker (held against a white surface).
5. Then add 5 drops of phenolphthalein to the milk sample and gently stir.
6. Use the syringe to let the NaOH run drop by drop into the sample while stirring it in.
7. Continue to do so until the appearance is a light pink color which persists for 10-20 seconds.
8. Now to work out the percentage of acidity, look at the column or syringe and see how many ml of NaOH was used then multiply it by .1 (move the decimal point one place to the left) for the actual TA%
For an example: If the amount of NaOH used was 1.4ml then the titratable acidity is .14%
A Match Made In Heaven: When Bread Meets Cheese- Part One


Pao de Queijo- Brazil
Usually served at breakfast, this cheese-flavored roll is crispy on the outside and very chewy on the inside. Parmesan is often the cheese of choice in which this roll is made with for a delicious hit of cheese.
Cuñapé- Bolivia
The crispy outside of this Bolivian treat contrasts so well with the soft, cheesy inside. The key ingredients to this delicious bread are either cassava or tapioca flour inside of all-purpose flour that most people use.
Smørrebrød- Denmark
In the U.S, people often call a “Danish” something that consists of sweet cheese and pastry but traditionally in Copenhagen, a Danish is a delicious piece of rye bread which is coated in meats and butter with smoked or pickled fish as well as sliced cheeses.
Banerov Hatz- Armenia
This is a delicious combination of cheese and onions which are spread over a thin piece of dough which looks quite like a pizza. Some might say that it resembles an Alsatian Tarte Flambee.
Panino- Italy
Nobody combines bread and cheese better than Italy! This grilled cheese sandwich is known as Panino and dates back to Milanese sandwich bars called Pani note Che from the 1970s. It can often contain salads and of course, delicious melted cheese.
Paneer Paratha- India
This famous cheese “Paneer” of India is used in this Indian delicacy which is paired with unleavened bread “Paratha”. These two pairs up and get filled with spiced and are fried and served at breakfast or on it’s on for a light meal.
Beer And Cheese Soda Bread- Ireland
Since the Irish love beer and sharp cheese, it is no surprise that their contribution to this list is beer and cheese soda bread. There is no yeast in the soda bread but there are beer and cheese, which is good enough for us. Some people even add bacon to the mix, what could be better?
Toastie- England
For toasties, cheddar cheese is the selected cheese for this English delicacy. It is pretty much England’s version of the grilled cheese from the U.S. However, the difference between toastie’s and grilled cheese is that the toastie is buttered on the inside and is toasted.
Rasgulla- Bangladesh
These little bread balls are sweet and spongy which are served throughout Indian subcultures in Southeast Asia, Bangladesh in particular. Rasgullas are usually made with an Indian cottage cheese known as ‘Chhena’. They are also made with semolina dough and light syrup. People often eat them as a dessert.
Pan de Bono- Colombia
Very similar to a Colombian bagel, Pan de Bono is usually paired with a hot chocolate. It is made out of cornmeal, question, egg, starch and feta cheese.
Lángos- Hungary
Fried bread is one of the most popular street foods in Hungary. However, the sour cream and melted shredded cheese on top make it a lot more savory. A lot of the time, vendors will add other toppings to it or stuff them with requested ingredients.
Flammkuchen- Germany
Flammkuchen translates to flame cake and is quite similar to pizza. Its thin dough is topped with onions, pork, and soft cheese. It is then cooked in a wood-fired oven to create the perfect combination of gooey, crispy cheese bread.
Tiropsomo- Greece
This perfect combination created by Greeks is feta and bread which is best served warm. It is usually served with dinner, however, leftovers can be reheated to accompany breakfast.
Croque Monsieur- France
Despite this sandwich not being able to exist without the ham, it still is best known for its cheese as well. The French cheese is similar to Gruyere with its nutty flavor which is placed in between two slices of bread and topped with nutmeg. It is then baked, broiled and served.
Khachapuri- Georgia
This popular snack is eaten instead of pizza in Georgia. It is made with sugar, dry yeast, flour, salt, and olive oil. It is topped with lots of butter, eggs and feta cheese and a melty cheese. Yum!
Pasteurized Or Unpasteurized- Which Is Best?
At Shisler’s Cheese House, we home a number of cheeses soft, hard, blue- you name it. These cheeses are either made with pasteurized or unpasteurized milk, it usually comes down to the cheesemakers choice, however, some regulations restrict cheesemakers, for example, Stilton has to be made with pasteurized milk and Comte, which has been subject to many controversies, has to be made using unpasteurized milk.
The biggest wonders that come up when discussing the two kinds of milk are first, is pasteurized milk safer than unpasteurized milk? Secondly, does cheese being made with unpasteurized milk taste better?
The most important subject to discuss is obviously if pasteurized milk is safer. It is not an easily answered question, you need to look at the risks and safety concerns surrounding unpasteurized milk, first.
It is common that cheesemaking rooms will contain lots of different bacteria, mainly good bacteria, but then there are quite a few bad bacterias. Some of the bad bacterias that may be present can contaminate milk or cheese with E-coli, Salmonella, and Listeria. However, there are ways to keep these under control and minimize the risks. Some of these ways are actually part of the cheesemaking processes, such as salt dehydrates, these help a lot because a lot of bacteria requires moisture to thrive. Other processes include appropriate procedures during the handling of the milk, the cheesemaking and the maturing of the cheese, shipping, and packaging.
What Is Pasteurisation?

Pasteurization is the process of heating the milk to around 160 degrees Fahrenheit for 15-25 seconds. This is to kill the pathogens which were mentioned above, not only that, but it kills pretty much everything else, which can be bad as some are important in cheesemaking as they act as a natural defense which comes from the milk. This process also allows for more errors as cheesemakers can become complacent which increases contamination risks. However, that being said, all cheesemakers that Shisler’s Cheese House works with, are never complacent and work to a high and safe standard at all times.
The main thing we believe is that with the safe and controlled handling of milk and cheese, whether it is pasteurized or not, the outcome will be the cheese that is safe to eat, with no significant risks either way.
Does Unpasteurised Milk Taste Better?

This question is equally as challenging as the previous one. Tying it back into how the process of pasteurization kills all bacteria, good and bad, a lot of friendly cultures essential for tasty cheese are destroyed and therefore they have to be reintroduced back into the milk after pasteurization. However, this still doesn’t help because the microflora is damaged and not passed onto the cheese no matter what. This poses a potential drawback in using pasteurized milk. That being said, it’s not justifiable to just say that unpasteurized milk is better, it is indeed a big factor for great cheese which has the potential to make better cheese. Then again, there are many amazing pasteurized milk kinds of cheese because of the skill of the cheesemaker.
In conclusion, cheeses which are made with unpasteurized milk are equally as safe to eat as those made with pasteurized milk and cheese which is made with unpasteurized milk has potential to taste better but that is just one of the factors that go towards the overall quality of cheese.
Get Cheesy This Fourth Of July!
With the 4th of July being a huge milestone in our country’s history, it is a day where families and friends get together and celebrate it at parades, cookouts, parties- you name it! And the biggest things that center these celebrations are food, alcohol, and fireworks (in no particular order!)

Now, focusing on the food aspect which I’m sure we are all most excited for, let’s take a look at one particular dish which is not only patriotic but also a cheesy delight. Here is a delicious cheese dip that you can make ahead of time so you only have to warm it up before the festivities.
The best cheese found for this delicious dip has got to be our White Cheddar at Shisler’s Cheese House. With its sharp flavor, it really pairs well with the sweet Vidalia onions which are also used in this recipe.
This cheese is so high quality and has such a creamy texture and flavor that it makes it perfect for this recipe as it focuses mainly around the cheese. Not only that but it is a great melting cheese, as discussed in some of our other articles, the type of cheese you melt is important, as not all melt the same or at all. You might know already about how good white cheddar is for melting with it being the season for grilling!
To impress even more at your event, you can keep it festive by making your own tortilla chips to go with the dip. It is very easy, all you have to do is take some flour tortillas and a star cutter and go nuts! You bake for a few minutes on 350 or until they begin to become golden.
Be warned, these are addictive so you might want to make a lot! Enjoy!
Recipe For Cheese Dip

What You Need
-
1-1/2 cups Cracker Barrel Vermont White Cheddar Cheese, shredded
-
1/3 cup mayonnaise
-
3 ounces cream cheese, softened
-
1/3 cup diced Vidalia onion
-
1/2 teaspoon pepper
-
1/4 teaspoon herbs de Provence
-
1/4 teaspoon creole seasoning
What To Do
1. Mix all ingredients fully and place in a baking dish.
2. Bake for 25-30 minutes at 375 degrees or until golden.
How The Aging Process Works
As they say in the real world, age doesn’t matter. However, in the cheese world, it truly does matter. Aging, otherwise called ripening is one of the most important parts when producing cheese. When we set cheeses to mature in controlled environments, they begin to develop their unique textures, appearances, aromas, and flavors. For example, when Swiss cheese ages, holes begin to form and it firms up.
Timing

The scientific processes of when cheese ages are as followed: the enzymes and microbes develop inside the cheese and breaks down milk fat and proteins into a complex mix of amino and fatty acids. In simpler terms, aging basically transforms the texture of the cheese and intensifies the flavor.
For most cheeses, the aging period usually requires two weeks to two years in order to develop their unique attributes. When cheese ages it generally gets a lot more firm and distinctive in flavor and aroma. When aged for 24+ months, Parmigiano Reggiano becomes a lot more complex, developing a fruity taste alongside a gritty, firm texture. Not every cheese is aged though, mild cheese like cream cheese, cottage cheese and ricotta aren’t aged at all and are consumed when fresh.
Temperature

Temperature is very important when it comes to aging. Cheese is stored in cellar or cave type environments which have a closely monitored temperature and humidity. Not all environments are the same though, it all depends on what type of cheese is being made. When it comes to aging, soft cheeses, cooler temperatures are used and the process takes a lot longer because you must age soft cheeses slower to avoid bacteria, in a result of high moisture. If you want to age firm cheeses, high temperatures are used to get rid of excess moisture.
For general aging, the temperatures of the environments that aging takes place in a range between 10 degrees C to 15 degrees C. High moisture conditions are pretty normal, along with at least 80% humidity upwards.
Aging Techniques
Like many things, there are different ways to age cheese. Lots of different techniques are used to make many of the amazing cheeses we love. There are two main techniques which are called surface ripening and interior ripening.
For surface ripening, the aging begins on the outside of the cheese and progresses towards the inside. To encourage the growth of rind, microorganisms are rubbed onto the outer surface of the cheese. Brie, Munster, Morbier are an example of surface ripened cheeses which are also washed in a saltwater brine during the process. Sometimes, the brine is seasoned with wine and spices which carry flavor into the cheese and nurtures bacterial growth.
When it comes to interior-ripened cheeses, it is opposite to surface ripening and begins from the inside of the cheese and moves outward. The cheese is coated with wax to prevent further oxygen action on the surface, once it is done aging. Examples of an interior- ripened cheeses are Cheddar and Swiss.
For interior-ripened blue cheeses such as Gorgonzola, Stilton, and Roquefort, they contain additional bacteria and molds introduced to them during an aging period. Sometimes, the Penicillium molds are injected into the curd whereas other times, the microbes are already present in the air and grow within the aging cheese. For these molds, they grow into small fissures within the cheese, creating the famous blue-green veins and sharp flavor throughout the cheese.
Have You Tried These Imported Cheeses?
Although importing cheeses is not exactly the greatest thing for the environment, it is great having so many amazing choices. Importing and exporting opens up new worlds, new realities for all of us cheese lovers. Even then, with so much choice, we can sometimes stick to the safe options and what we know; with this, we should definitely experiment and broaden our horizons.
Here are some of the best imported cheese with great variety at the same time:
Italian

Fontina
Although other countries produce their own version of this cheese, Italy’s version is definitely one of a kind, identified by its stamp. This semi-soft cow’s milk cheese has a rind that forms naturally because of the aging process, the interior color is yellow or orange-brown. The texture is different depending on the age. When it is younger, the cheese is a lot more flexible and melts well, so it is ideal for fondues or casserole dishes. When the cheese is matured, it is firmer and grates well.
Caciocavallo
This is a semi-hard cheese which is made from either cow’s or more interestingly- ewes milk. The process which is used when producing this cheese involves spinning the crafted cheese strings into pear shapes that are then cured in brine or salt for a couple days. The string is then tied around the neck to create a separate ball above the main boy of cheese. It is then aged by being hung over poles.
Spanish

Valdeon
This blue cheese is made from goat’s and cow’s milk. It comes from the Picos de Europa mountain range, being mature in limestone caves, traditionally, for at least 2 months. The flavor is tangy and earns its place on a cheeseboard or fits perfect in recipes which need blue cheese.
The Drunken Goat
I know what you’re thinking, what a strange name! However, despite all the things a drunken goat could mean, this is a goat’s milk cheese from the Spanish Mediterranean coast. This cheese has a purple rind and gets the ‘drunken’ from the fact that it is cured in red wine. See, it wasn’t what you thought and is delicious in every way!
French

Boulette d’Avesnes
From the village of Avesnes near the Belgian border, this iconic cheese is shaped into conical parcels. It is a case of the notion that if you don’t mind a very stinky cheese with a strong, spicy taste, then you will enjoy it! It is produced from the damaged whey of curds that is then mashed with spices and herbs. It is then washed every week in beer and matured for around 4 months.
Banon
Like many kinds of cheese, Banon is named after the village of origin. It was first produced in 1270 and is made from cow’s milk with a strong woody flavor to it. The texture is soft with earthy aromas. When being produced, the cheese is molded by hand before the maturing process begins. After the maturing stage, the cheese is then wrapped in dried chestnut leaves to continue maturing for a further 2 weeks.
If this delicious list isn’t enough for you to try, here are a few more options!
– Delft Blue- Holland
– Trappistenkase- Germany
– Tete de Moine- Switzerland
– Bergkase- Austria
Melting Cheese- How Does It Work?
Everyone loves hot, gooey, cheesy heaven- be it America’s favorite grilled cheese, the melty delight which is fondue or even just that sprinkle of cheese you melt over your favorite casserole. Along the way, you may have tried different cheeses and enjoyed their different textures and delicious flavors, but you also may have noticed that some of those delightful cheeses don’t turn smooth and melty like others. Now just because they don’t melt very well, doesn’t mean we love them any less, they are just better for other uses. You might have wondered why your cheese doesn’t melt very well and what to look for in cheese to know whether it melts or not so here is some information to help you along the way.

The most important thing you need to know when it comes to melting cheese is that melting is all to do with the fat. The ratio between the water and the fat in the cheese is really what determines how well the cheese is going to melt. So with that, a cheese which is higher in moisture is usually a lot better to melt than a drier one. The reason for this is because of the structure of the protein. The protein keeps the fat and water separated and it is looser in high moisture cheeses as opposed to dry ones which are a lot more rigid.

So, with this knowledge, when heat is applied to most cheeses, the fat globules go from solid to liquid which is when the cheese starts becoming that yummy, gooey consistency. When it comes to the protein, the structure loosens under the heat and again, the consistency becomes very loose and thick. It really depends on the cheese how the liquid goes, it could be very sticky or be very liquidy and drip like fondue.

This is also why age is important when it comes to cheese. For fresh cheese, they don’t have a maturity level which makes their proteins very tightly wound up. When they age a little, the proteins begin to loosen up, creating a more open matrix. This matrix is flexible which helps with melting the cheese to smooth consistency without the matrix breaking. However, problems do arise when the cheese ages too much, it makes the proteins tighten up into clumps, which is why crispy cheese happens.


